
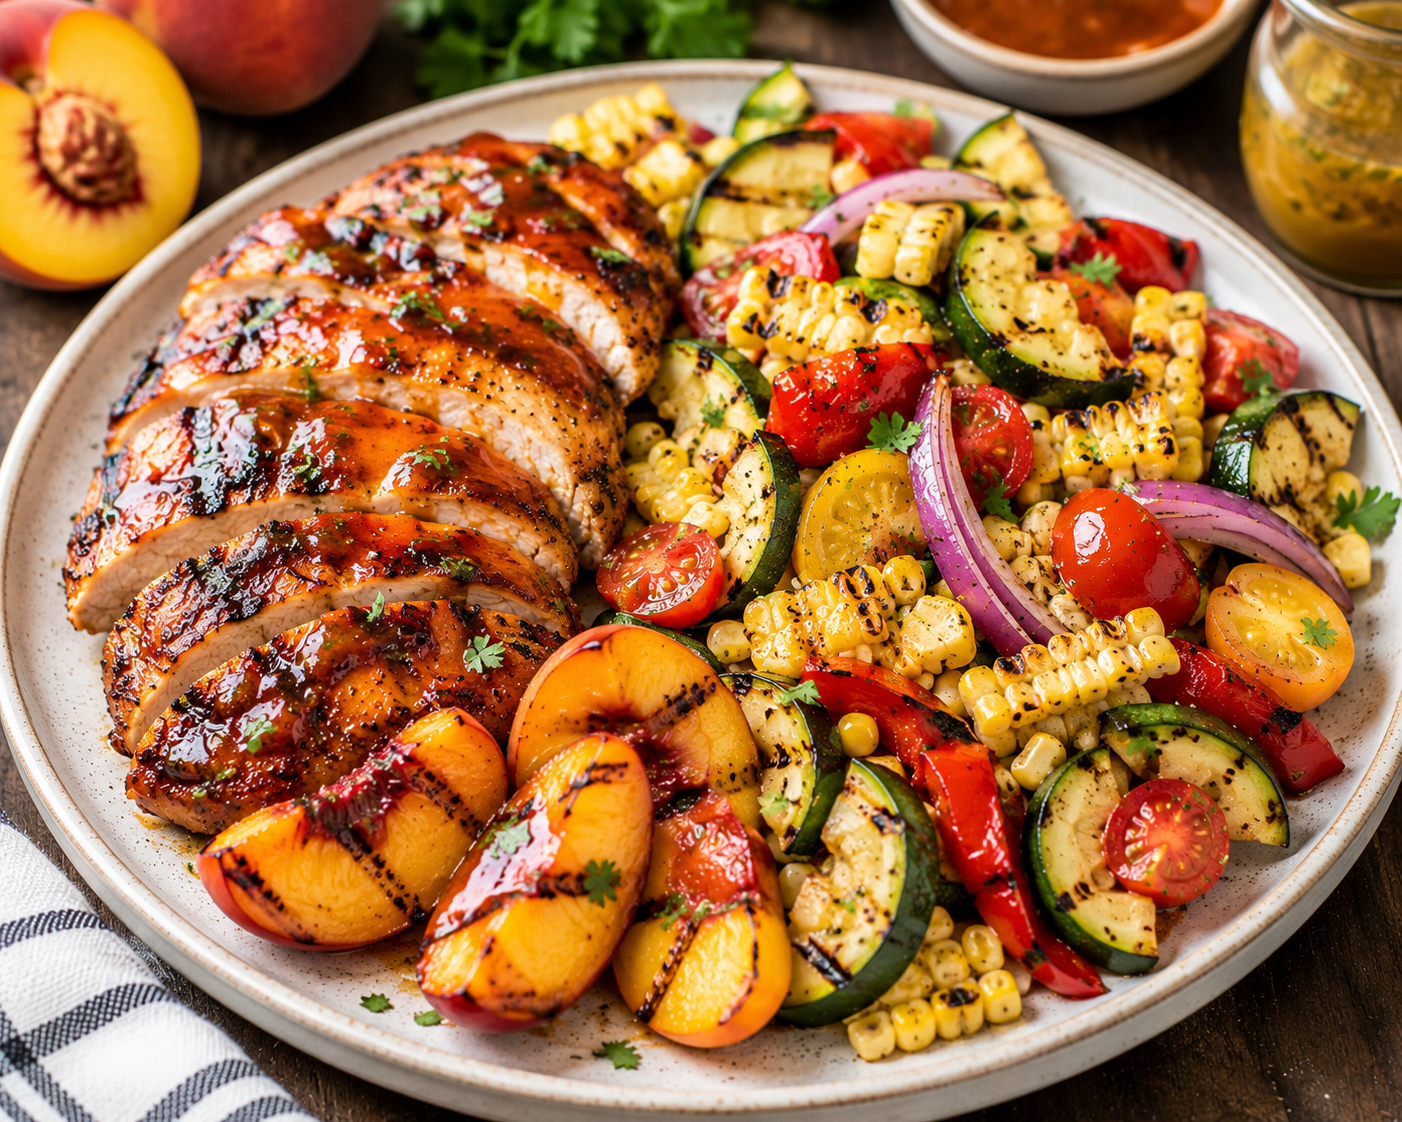
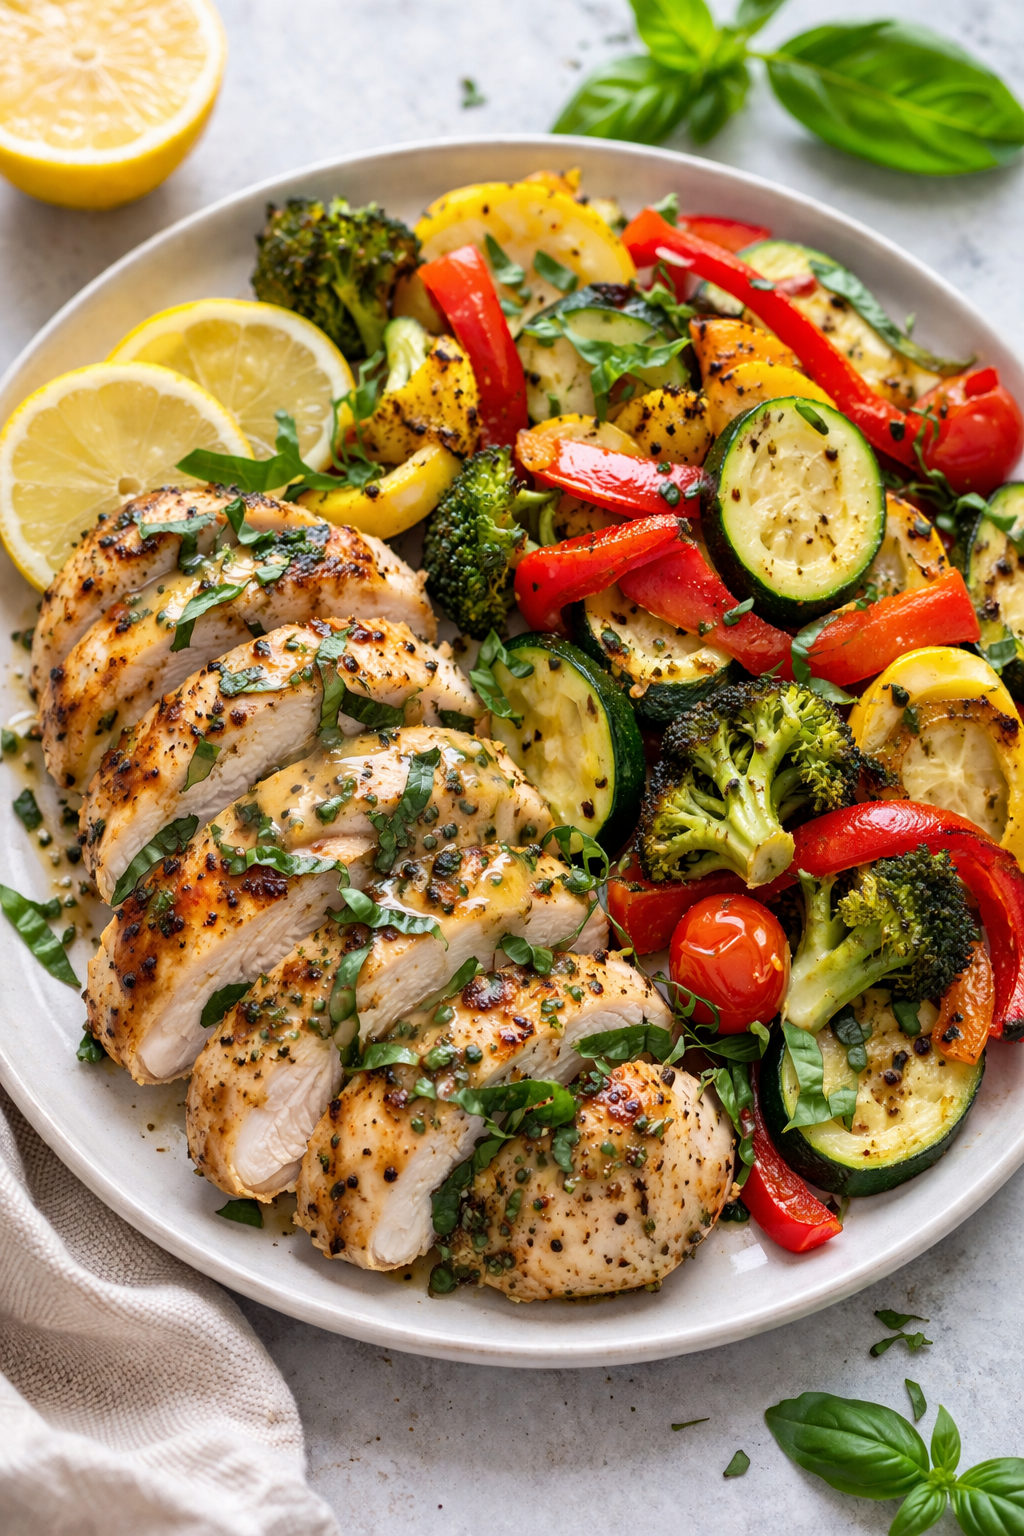
🍑🍗 Peach BBQ Chicken with Grilled Summer Vegetable Salad
There are certain flavors that immediately say "summer."
Fresh peaches picked at their peak.
The smell of something delicious cooking on the grill.
Long evenings spent outside with family and friends.
The problem is that many traditional barbecue meals can leave us feeling weighed down, especially during the hottest months of the year.
That's why I love finding ways to capture those classic summer flavors while keeping things fresh, balanced, and energizing.
This Peach BBQ Chicken with Grilled Summer Vegetable Salad does exactly that.
Tender grilled chicken is brushed with a naturally sweet peach barbecue glaze that delivers all the smoky, tangy flavor you expect from a backyard cookout. Instead of heavy sides, it's paired with a colorful grilled vegetable salad packed with fresh summer produce.
The result is a meal that feels indulgent enough for a weekend gathering but healthy enough for a busy weeknight.
Because healthy eating should fit into every season of life—including barbecue season.
Why You'll Love This Recipe
✔️ Gluten-free & dairy-free
✔️ High protein
✔️ Naturally sweetened BBQ sauce
✔️ Loaded with summer vegetables
✔️ Great for meal prep
✔️ Perfect for grilling season
✔️ Family-friendly
🍑 Peach BBQ Chicken with Grilled Summer Vegetable Salad
Prep Time
20 minutes
Cook Time
20 minutes
Total Time
40 minutes
Serves
4
Ingredients
Peach BBQ Chicken
1½ lbs boneless skinless chicken thighs
1 tbsp olive oil
1 tsp sea salt
½ tsp garlic powder
½ tsp onion powder
Peach BBQ Glaze
2 ripe peaches, peeled and diced
½ cup tomato sauce
2 tbsp apple cider vinegar
2 tbsp honey
1 tbsp coconut aminos
1 tsp smoked paprika
½ tsp garlic powder
½ tsp onion powder
½ tsp sea salt
Grilled Summer Vegetable Salad
2 zucchini, sliced lengthwise
2 ears corn, husked
1 red bell pepper, quartered
1 pint cherry tomatoes
¼ red onion, thinly sliced
2 tbsp olive oil
½ tsp sea salt
Lemon Herb Vinaigrette
3 tbsp olive oil
Juice of 1 lemon
1 tbsp fresh parsley, chopped
1 tsp Dijon mustard (optional)
Pinch of sea salt
Instructions
Step 1: Make the Peach BBQ Glaze
Combine peaches, tomato sauce, apple cider vinegar, honey, coconut aminos, paprika, garlic powder, onion powder, and salt in a saucepan.
Bring to a simmer over medium heat.
Cook for 10–15 minutes until peaches soften.
Blend until smooth and set aside.
Step 2: Prepare the Chicken
Season chicken with:
Olive oil
Sea salt
Garlic powder
Onion powder
Grill over medium-high heat for 5–6 minutes per side.
Brush generously with peach BBQ glaze during the final few minutes of cooking.
Cook until chicken reaches 165°F.
Step 3: Grill the Vegetables
Brush zucchini, corn, and bell pepper with olive oil and salt.
Grill until lightly charred and tender:
Zucchini: 3–4 minutes per side
Corn: 8–10 minutes, rotating occasionally
Bell peppers: 4–5 minutes
Allow vegetables to cool slightly.
Slice zucchini and peppers. Remove corn kernels from cob.
Step 4: Make the Vinaigrette
Whisk together:
Olive oil
Lemon juice
Parsley
Dijon mustard (if using)
Salt
Step 5: Build the Salad
Combine grilled vegetables with cherry tomatoes and red onion.
Toss with vinaigrette.
Step 6: Serve
Plate grilled chicken alongside the vegetable salad.
Serve with extra peach BBQ glaze if desired.
Meal Prep Tips
✅ Store chicken and salad separately.
✅ Peach BBQ sauce keeps well for up to 5 days.
✅ Great served warm or chilled.
Why This Recipe Works Right Now
Late summer produce is at its absolute best.
Peaches are sweet and juicy.
Corn is fresh and flavorful.
Grilling keeps the kitchen cool while adding incredible flavor.
This recipe celebrates all of it while supporting your health goals.
Final Thoughts
Healthy eating doesn't mean missing out on summer traditions.
Sometimes it's about finding creative ways to enjoy them.
This Peach BBQ Chicken with Grilled Summer Vegetable Salad brings together everything we love about the season:
Fresh produce.
Backyard barbecue flavors.
Simple ingredients.
Meals that leave you feeling nourished and energized.
Because the best summer memories are made around good food shared with people you love.
Happy cooking!

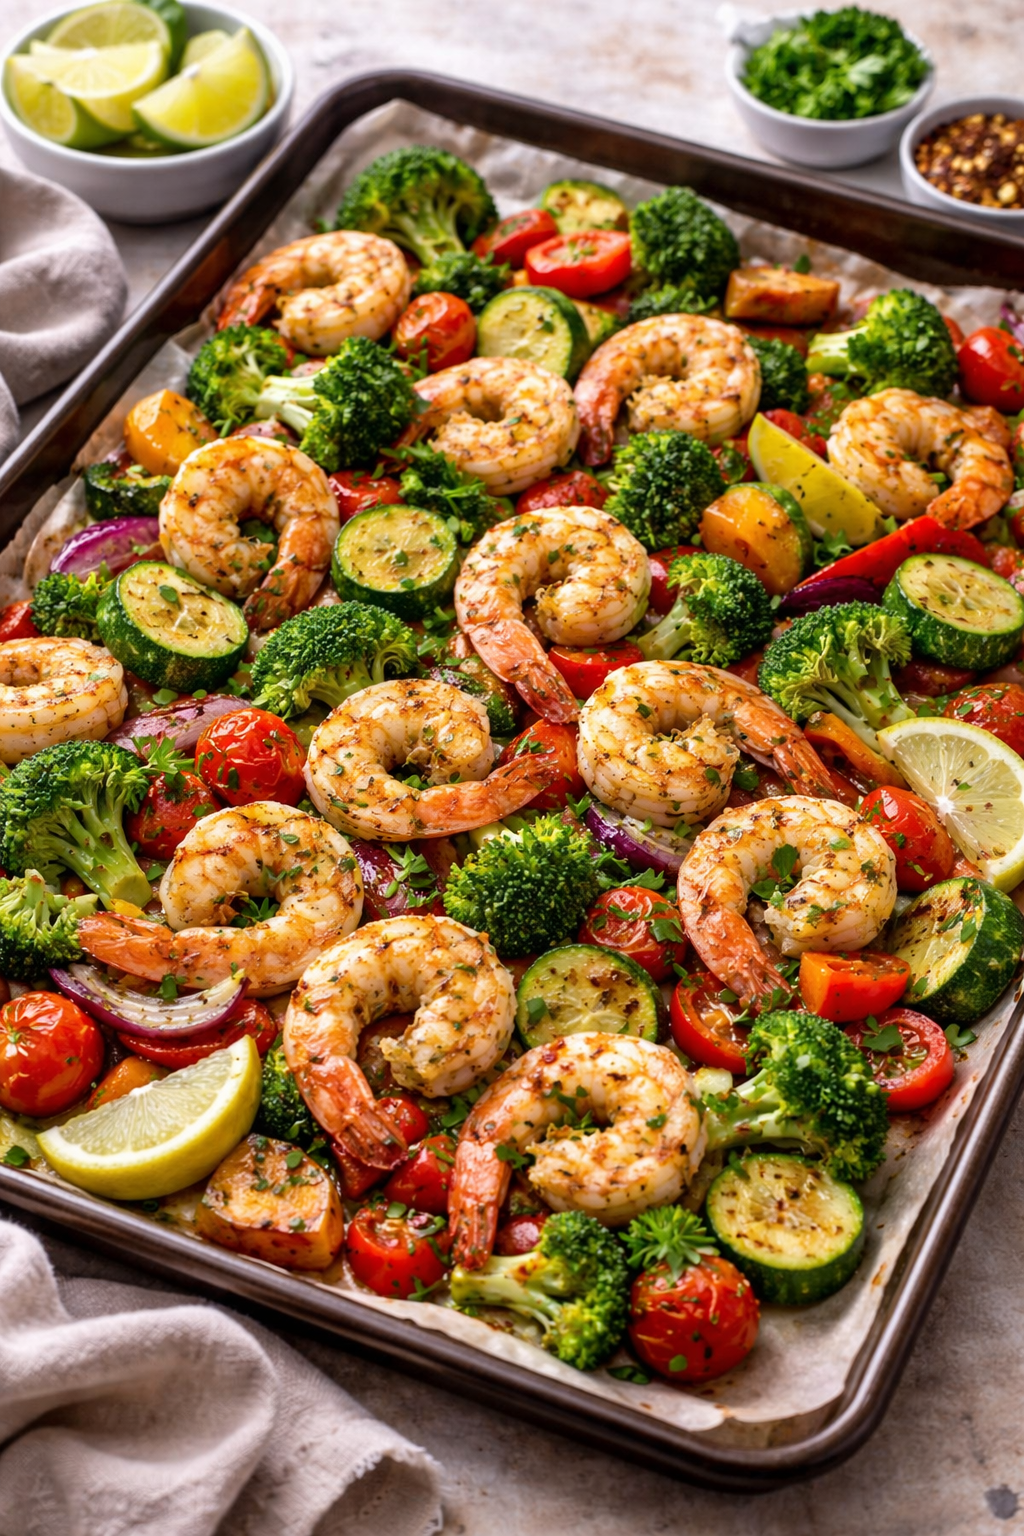
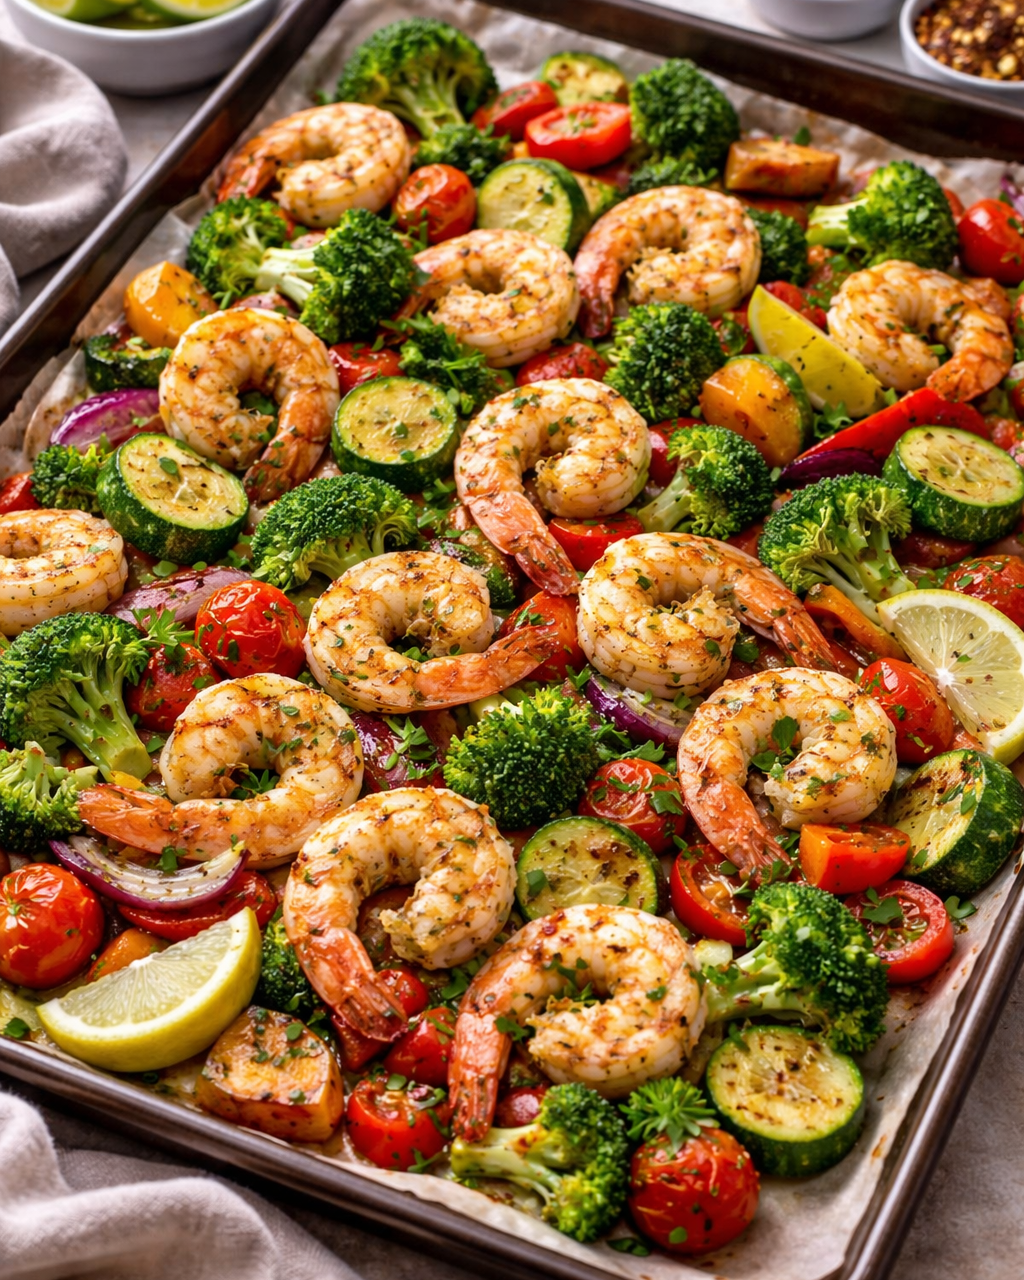
🌽🍤 Cajun Shrimp & Summer Succotash Skillet

When most people think of Louisiana cooking, they picture rich gumbos simmering on the stove, creamy étouffées served over rice, and comfort foods that practically demand an afternoon nap afterward.
And while those dishes absolutely have their place, summer calls for something a little different.
As temperatures climb, our bodies naturally crave meals that feel lighter and fresher—but that doesn't mean we have to sacrifice the bold flavors we love.
That's exactly why I love this Cajun Shrimp & Summer Succotash Skillet.
It captures everything that makes Louisiana cuisine so special: smoky spices, vibrant vegetables, and layers of flavor that make every bite exciting. But instead of feeling heavy, this version leans into the best ingredients summer has to offer.
Sweet corn fresh off the cob. Juicy cherry tomatoes. Crisp bell peppers. Tender shrimp seasoned with just enough Cajun spice to wake up your taste buds without overpowering the dish.
The result is a meal that's colorful, satisfying, and packed with flavor while still leaving you feeling energized.
Even better? It all comes together in one skillet in about 30 minutes.
Because healthy eating shouldn't mean saying goodbye to the foods and flavors you love. Sometimes it just means finding new ways to enjoy them.
Why You'll Love This Recipe
✔️ Gluten-free & dairy-free
✔️ Ready in 30 minutes
✔️ One-pan cleanup
✔️ High protein
✔️ Loaded with summer vegetables
✔️ Bold Louisiana-inspired flavor
✔️ Great for meal prep
🍤 Cajun Shrimp & Summer Succotash Skillet
Prep Time
15 minutes
Cook Time
15 minutes
Total Time
30 minutes
Serves
4
Ingredients
Cajun Shrimp
1½ lbs wild-caught shrimp, peeled and deveined
1 tbsp avocado oil
2 tsp Cajun seasoning (gluten-free)
½ tsp garlic powder
½ tsp onion powder
¼ tsp cayenne pepper (optional)
½ tsp sea salt
Juice of ½ lemon
Summer Succotash
2 cups fresh corn kernels (about 3 ears of corn)
1 red bell pepper, diced
1 pint cherry tomatoes, halved
½ red onion, diced
4 slices turkey bacon, chopped (optional)
2 cloves garlic, minced
1 tbsp avocado oil
½ tsp sea salt
¼ tsp black pepper
To Finish
2 green onions, sliced
2 tbsp fresh parsley, chopped
Lemon wedges
Your favorite hot sauce (optional)
Instructions
Step 1: Season the Shrimp
In a medium bowl, toss the shrimp with:
Avocado oil
Cajun seasoning
Garlic powder
Onion powder
Cayenne pepper (if using)
Sea salt
Set aside while you prepare the vegetables.
Step 2: Crisp the Turkey Bacon
Heat a large skillet over medium heat.
Add the chopped turkey bacon and cook until crisp, about 4–5 minutes.
Transfer to a plate and set aside.
Step 3: Build the Succotash
Using the same skillet, add:
Red onion
Bell pepper
Cook for 4–5 minutes until they begin to soften.
Stir in:
Garlic
Corn
Cherry tomatoes
Sea salt
Black pepper
Cook another 4–5 minutes until the tomatoes begin to soften and the corn becomes tender.
Return the turkey bacon to the skillet.
Step 4: Cook the Shrimp
Push the vegetables to one side of the skillet.
Add the shrimp in a single layer.
Cook for 2–3 minutes per side until pink, opaque, and cooked through.
Squeeze fresh lemon juice over the entire skillet.
Step 5: Finish Strong
Remove from heat and top with:
🌿 Fresh parsley
🌿 Green onions
🍋 Extra lemon wedges
🔥 Hot sauce, if desired
Serve immediately and enjoy.
Meal Prep Tips
This recipe is perfect for busy weeks.
✅ Store leftovers in airtight containers for up to 3 days.
✅ Reheat gently to avoid overcooking the shrimp.
✅ Serve over cauliflower rice, jasmine rice, or enjoy exactly as is.
Why This Recipe Works Right Now
Summer produce shines in this dish.
Fresh corn adds natural sweetness. Tomatoes provide brightness. Bell peppers bring crunch and color.
Combined with bold Cajun spices and protein-packed shrimp, you get a meal that's satisfying without being heavy.
It's the perfect reminder that healthy eating doesn't have to be bland or boring.
Sometimes all it takes is a little inspiration from Louisiana and a skillet full of summer ingredients.
Final Thoughts
Some recipes become favorites because they're easy.
Others because they're healthy.
The best ones? They're both.
This Cajun Shrimp & Summer Succotash Skillet brings together everything we love about summer cooking:
Fresh ingredients.
Bold flavors.
Simple preparation.
And just enough Louisiana flair to make dinner feel a little more exciting.
If you make this recipe, I'd love to hear what you think. Did you keep it mild, or turn up the heat with extra Cajun spice and hot sauce?
Happy cooking, friends!
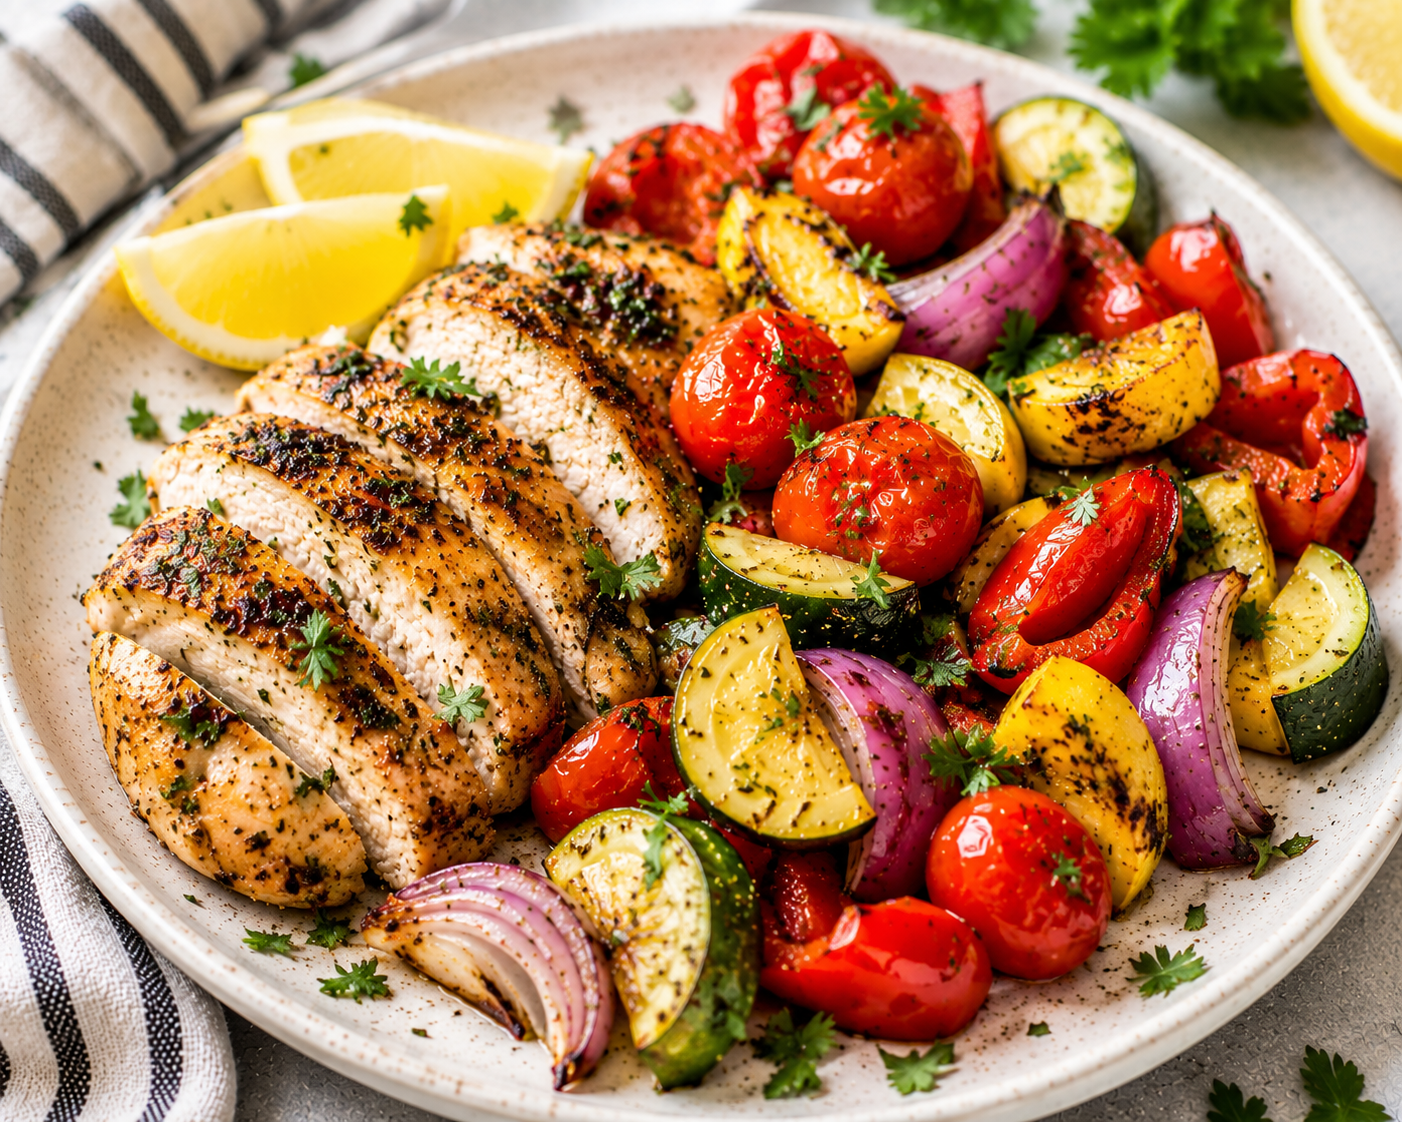
🍋🌿 Sheet Pan Mediterranean Chicken & Summer Vegetables

There are some recipes that earn a permanent spot in your rotation.
Not because they're fancy.
Not because they're trendy.
But because they solve a problem.
You know the nights I'm talking about.
The kids have activities. Work ran longer than expected. The kitchen isn't exactly calling your name.
You want something healthy, but you also don't want three pans on the stove and a sink full of dishes afterward.
That's where this recipe comes in.
This Sheet Pan Mediterranean Chicken & Summer Vegetables is one of my favorite types of meals because it delivers big flavor with surprisingly little effort.
Everything cooks on one pan.
The chicken gets infused with lemon, garlic, and herbs while the vegetables caramelize and soak up all those incredible flavors.
It's colorful, nutritious, and the kind of meal that makes healthy eating feel simple.
And honestly, during the summer, simple is a win.
Why You'll Love This Recipe
✔️ Gluten-free & dairy-free
✔️ One-pan cleanup
✔️ Packed with vegetables
✔️ Great for meal prep
✔️ Family-friendly
✔️ Ready in about 40 minutes
✔️ Perfect for busy summer evenings
🍋 Sheet Pan Mediterranean Chicken & Summer Vegetables
Prep Time
15 minutes
Cook Time
25 minutes
Total Time
40 minutes
Serves
4-6
Ingredients
Chicken
2 lbs boneless skinless chicken thighs or breasts
2 tbsp olive oil
Juice of 1 lemon
Zest of 1 lemon
4 cloves garlic, minced
1 tsp oregano
1 tsp parsley
1 tsp sea salt
½ tsp black pepper (optional)
Vegetables
1 zucchini, sliced
1 yellow squash, sliced
1 red bell pepper, sliced
1 pint cherry tomatoes
½ red onion, sliced
2 tbsp olive oil
½ tsp sea salt
For Serving
Fresh parsley
Lemon wedges
Optional: rice, cauliflower rice, or mixed greens
Easy Step-by-Step Instructions
Step 1: Preheat the Oven
Preheat oven to 425°F.
Line a large sheet pan with parchment paper for easier cleanup.
Step 2: Season the Chicken
In a large bowl combine:
olive oil
lemon juice
lemon zest
garlic
oregano
parsley
salt
pepper
Add chicken and toss until evenly coated.
Step 3: Prep the Vegetables
Add vegetables to a separate bowl.
Toss with olive oil and salt.
Spread evenly across the sheet pan.
Step 4: Arrange Everything
Nestle the chicken between the vegetables.
Try to keep everything in a single layer so the vegetables roast instead of steam.
Step 5: Roast
Bake for 22–28 minutes, depending on the thickness of your chicken.
Chicken should reach an internal temperature of 165°F.
The vegetables should be tender with lightly caramelized edges.
Step 6: Finish Strong
Sprinkle with fresh parsley and squeeze fresh lemon over everything right before serving.
Meal Prep Tips
This recipe is a meal-prepper's dream.
✅ Cook once and enjoy multiple lunches.
✅ Store in airtight containers for up to 4 days.
✅ Serve over rice one day and greens the next for variety.
Why This Recipe Works Right Now
Summer produce is at its best right now.
Zucchini, squash, tomatoes, peppers, and fresh herbs are everywhere, which means more flavor and better value.
This recipe celebrates those ingredients without requiring a lot of time or effort.
And honestly, that's what healthy eating should feel like.

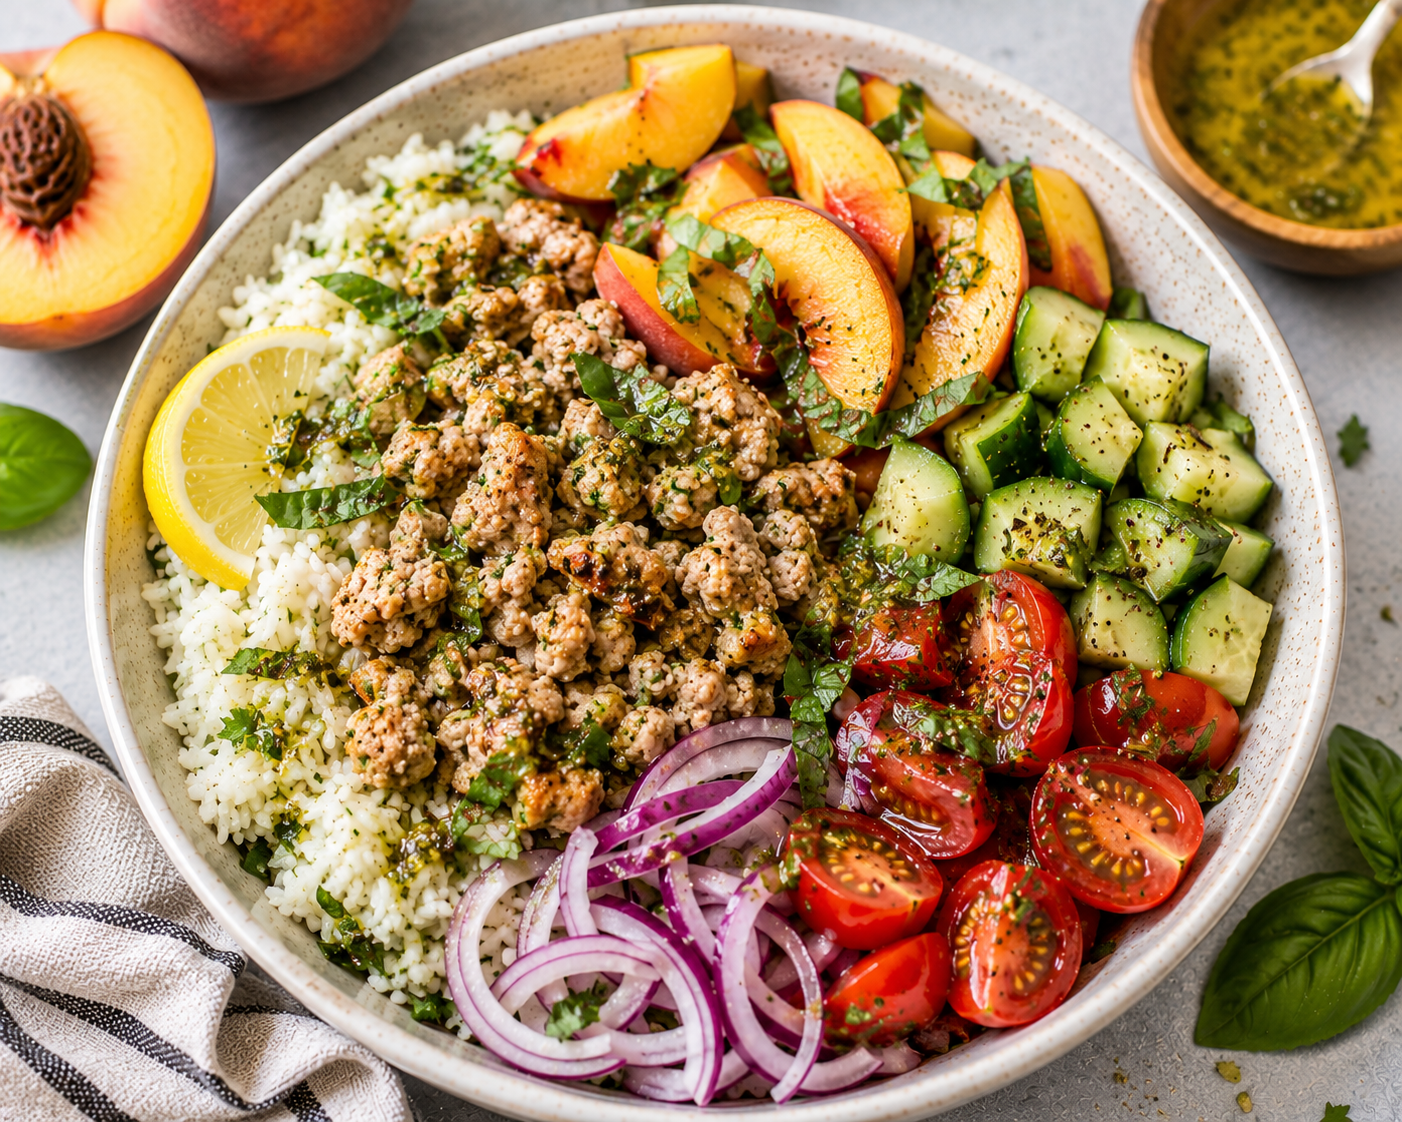
🍑🌿 Peach Basil Turkey Bowls with Lemon Herb Rice
🌿 The Story
There’s something about summer that makes you want food that feels a little brighter.
You stop craving heavy meals and start wanting things that feel:
☀️ fresh
🍑 seasonal
💪 satisfying without slowing you down
But here’s the challenge…
A lot of “healthy” summer meals either end up feeling like rabbit food… or they’re so light you’re raiding the pantry an hour later.
That’s where this one changes things.
These Peach Basil Turkey Bowls have that perfect balance of sweet, savory, fresh, and filling.
Juicy herb-seasoned turkey, warm lemon rice, fresh peaches, and bright basil all layered into a bowl that feels like summer in food form.
And before you question peaches in a savory dish…
Trust me on this one.
The sweetness with the herbs and citrus just works.
💪 Why You’ll Love This Recipe
✔️ Gluten-free & dairy-free
✔️ High protein
✔️ Fresh summer flavors
✔️ Great for meal prep
✔️ Family friendly
✔️ Ready in about 30 minutes
🍑 Peach Basil Turkey Bowls with Lemon Herb Rice
⏱ Quick Stats
Prep Time: 15 minutes
Cook Time: 20 minutes
Total Time: 35 minutes
Serves: 4
🛒 Ingredients
Turkey
1½ lbs ground turkey or turkey breast strips
1 tbsp olive oil
2 cloves garlic, minced
1 tsp Italian seasoning
¾ tsp sea salt
¼ tsp black pepper (optional)
Lemon Herb Rice
2 cups cooked jasmine rice
Juice of 1 lemon
1 tbsp olive oil
2 tbsp chopped parsley
Pinch of salt
Fresh Summer Toppings
2 ripe peaches, sliced 🍑
1 cup cucumber, diced
½ cup cherry tomatoes, halved
¼ cup fresh basil, sliced thin
¼ red onion, thinly sliced
Simple Lemon Basil Drizzle
¼ cup olive oil
Juice of 1 lemon
1 tbsp chopped basil
1 tsp honey
Pinch of salt
👩🍳 Easy Step-by-Step Instructions
Step 1: Cook the Turkey
Heat olive oil over medium heat.
Add turkey, garlic, Italian seasoning, salt, and pepper.
Cook 6–8 minutes until browned and fully cooked.
Step 2: Make the Lemon Herb Rice
Mix warm rice with:
lemon juice
olive oil
parsley
salt
Step 3: Make the Dressing
Whisk together:
olive oil
lemon juice
basil
honey
salt
Step 4: Build Your Bowls
Start with lemon herb rice.
Layer:
🍗 turkey
🍑 peaches
🥒 cucumber
🍅 tomatoes
🧅 onion
Step 5: Finish Strong
Top with:
🌿 fresh basil
🍋 extra lemon squeeze
✨ lemon basil drizzle
🔥 Meal Prep Tips
✅ Prep toppings separately for freshness
✅ Rice and turkey reheat well
✅ Add peaches fresh before serving
☀️ Why This Recipe Works Right Now
Summer meals should feel:
✔️ fresh
✔️ easy
✔️ satisfying
And this bowl gives you all three without feeling repetitive.
💛 Final Thoughts
Healthy eating doesn’t have to mean eating the same thing every week.
Sometimes one new flavor combination is all it takes to make healthy meals exciting again.
And this is one of those combinations.

🍤🥭 Coconut Lime Shrimp Bowls with Mango Slaw

🌿 The Story
There’s something about summer meals that should feel easy.
Not boring.
Not heavy.
Not something that leaves you feeling like you need a nap afterward.
You want meals that feel:
☀️ fresh
🥗 colorful
🔥 flavorful
💪 and still satisfying enough to keep you full
That’s exactly what this recipe does.
These Coconut Lime Shrimp Bowls with Mango Slaw are one of those meals that instantly feel like summer.
Juicy shrimp tossed in garlic, lime, and coconut flavors… paired with a crunchy mango slaw that hits that perfect sweet + savory balance.
It’s bright. Fresh. A little tropical. And honestly, it just feels good to eat.
The best part?
👉 It comes together fast
👉 It looks impressive
👉 And it tastes like something you’d order on vacation
💪 Why You’ll Love This Recipe
✔️ Gluten-free & dairy-free
✔️ High protein
✔️ Fresh + tropical flavor
✔️ Light but filling
✔️ Great for meal prep
✔️ Perfect for warm weather
🍤 Coconut Lime Shrimp Bowls with Mango Slaw
⏱ Quick Stats
Prep Time: 15 minutes
Cook Time: 10 minutes
Total Time: 25 minutes
Serves: 4
🛒 Ingredients
Coconut Lime Shrimp
1½ lbs shrimp, peeled & deveined
2 tbsp avocado oil
Zest + juice of 2 limes
2 cloves garlic, minced
½ tsp smoked paprika
¾ tsp sea salt
¼ tsp black pepper (optional)
2 tbsp coconut milk
Mango Slaw
2 cups shredded cabbage or slaw mix
1 ripe mango, thinly sliced or diced 🥭
1 cup shredded carrots
½ cucumber, julienned
¼ cup chopped cilantro
Slaw Dressing
2 tbsp lime juice
1 tbsp olive oil
1 tsp honey
Pinch of salt
Bowl Base Options
Jasmine rice
Coconut rice
Cauliflower rice
Mixed greens
Optional Toppings
Avocado slices
Jalapeños
Extra cilantro
Lime wedges
👩🍳 Easy Step-by-Step Instructions
Step 1: Prep the Shrimp
In a bowl, mix:
avocado oil, lime zest + juice, garlic, smoked paprika, salt, pepper, and coconut milk.
Add shrimp and toss to coat.
Let sit for 10 minutes while prepping the slaw.
Step 2: Make the Mango Slaw
In a large bowl, combine:
cabbage
mango
carrots
cucumber
cilantro
Whisk together lime juice, olive oil, honey, and salt.
Pour over slaw and toss lightly.
Step 3: Cook the Shrimp
Heat a skillet over medium-high heat.
Cook shrimp for 2–3 minutes per side until pink and slightly caramelized.
Do not overcook.
Step 4: Build Your Bowls
Start with your base of choice.
Add:
🍚 rice or greens
🍤 shrimp
🥭 mango slaw
Step 5: Finish Strong
Top with:
🥑 avocado
🌿 extra cilantro
🍋 fresh lime squeeze
🌶 jalapeños if you like heat
🔥 Meal Prep Tips
This one is amazing for hot weeks:
✅ Prep slaw ahead for easy lunches
✅ Cook shrimp slightly under if reheating
✅ Add avocado fresh before serving
☀️ Why This Recipe Works Right Now
When it’s hot outside, meals like this just hit differently.
You want:
✔️ fresh ingredients
✔️ lighter meals
✔️ bright flavor
✔️ quick prep
And this bowl delivers all of it.
💛 Final Thoughts
Healthy eating doesn’t have to feel repetitive.
Sometimes all it takes is:
🥭 fresh seasonal ingredients
🍋 bright flavor
🔥 simple cooking
And suddenly healthy meals feel exciting again.
This is one of those recipes you’ll want on repeat all summer long.

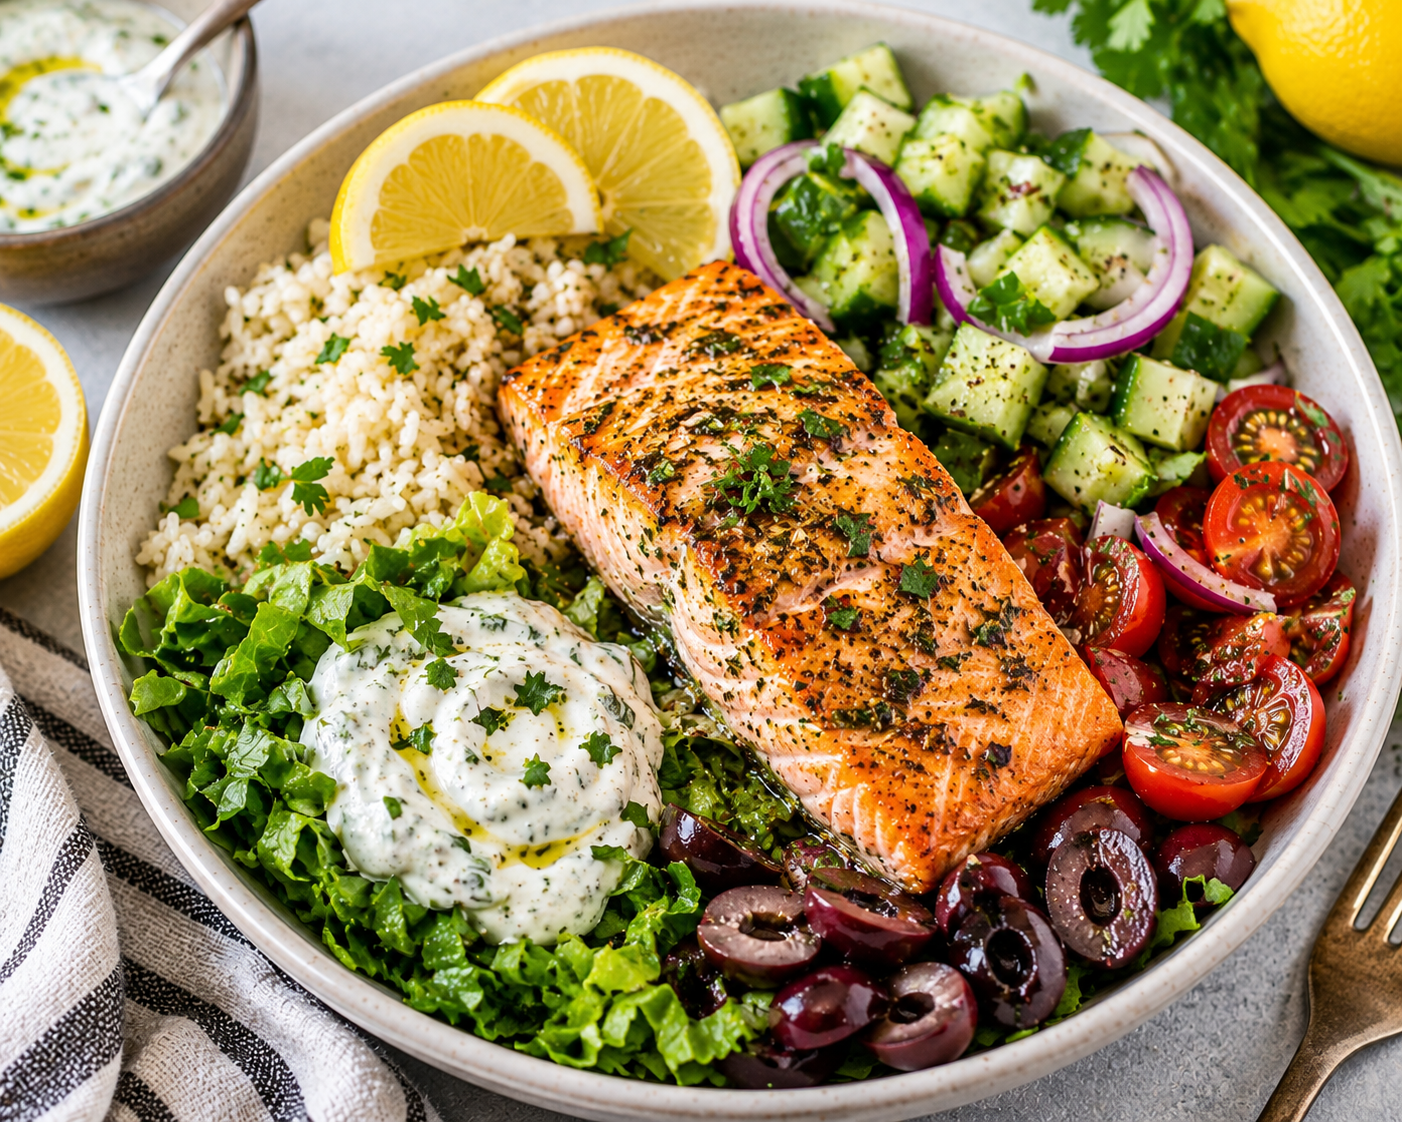
🍋🌿 Mediterranean Lemon Herb Salmon Bowls
🌿 The Story
There’s something about summer meals that just need to feel… easier.
Not boring.
Not plain.
Just lighter, fresher, and the kind of food that actually sounds good when it’s hot outside.
Because once temperatures start climbing, heavy comfort food loses its appeal fast.
You start craving:
☀️ bright flavors
🥒 crisp vegetables
🍋 fresh citrus
🔥 simple meals that still feel satisfying
That’s exactly why this recipe has become one of my favorites lately.
These Mediterranean Lemon Herb Salmon Bowls are packed with everything that makes warm-weather meals work:
perfectly roasted salmon
fresh cucumber + tomatoes
crisp greens
a bright lemon herb finish
It’s clean eating that doesn’t feel like “clean eating.”
And honestly… those are always the best meals.
💪 Why You’ll Love This Recipe
✔️ Gluten-free & dairy-free
✔️ High protein + healthy fats
✔️ Light but filling
✔️ Bright, fresh flavor
✔️ Great for meal prep
✔️ Perfect for hot weather
🐟 Mediterranean Lemon Herb Salmon Bowls
⏱ Quick Stats
Prep Time: 15 minutes
Cook Time: 15 minutes
Total Time: 30 minutes
Serves: 4
🛒 Ingredients
Lemon Herb Salmon
1½ lbs salmon fillets
2 tbsp olive oil
Zest + juice of 1 lemon
2 cloves garlic, minced
1 tsp oregano
½ tsp dill
¾ tsp sea salt
¼ tsp black pepper (optional)
Bowl Base
2 cups jasmine rice, quinoa, or cauliflower rice
2 cups chopped romaine or mixed greens
Fresh Mediterranean Toppings
1 cup cucumber, diced
1 cup cherry tomatoes, halved
¼ red onion, thinly sliced
½ cup kalamata olives (optional)
¼ cup chopped parsley
Dairy-Free Lemon Herb Sauce
½ cup dairy-free yogurt or mayo
Juice of ½ lemon
1 tbsp fresh dill
Pinch of garlic powder
Pinch of salt
👩🍳 Easy Step-by-Step Instructions
Step 1: Prep the Salmon
Preheat oven to 400°F.
In a small bowl, mix:
olive oil, lemon zest + juice, garlic, oregano, dill, salt, and pepper.
Brush generously over salmon.
Step 2: Roast the Salmon
Bake for 12–15 minutes, depending on thickness.
The salmon should flake easily with a fork.
Step 3: Make the Sauce
In a bowl, mix:
DF yogurt or mayo, lemon juice, dill, garlic powder, and salt.
Set aside.
Step 4: Prep the Bowl Ingredients
While salmon cooks:
chop cucumber
slice onion
halve tomatoes
prep greens and base
Step 5: Build Your Bowls
Start with your base, then layer:
🥬 greens
🍚 rice or quinoa
🐟 salmon
🥒 cucumber
🍅 tomatoes
🧅 onion
Step 6: Finish Strong
Top with:
🌿 parsley
🍋 fresh lemon squeeze
✨ lemon herb sauce
🔥 Meal Prep Tips
This one is perfect for prepping ahead:
✅ Roast salmon fresh or slightly under for reheating
✅ Store toppings separately for freshness
✅ Sauce keeps great for several days
☀️ Why This Recipe Works Right Now
This time of year, meals like this just hit differently.
You want food that:
✔️ feels fresh
✔️ gives you energy
✔️ doesn’t weigh you down
And this bowl checks every box while still feeling satisfying.
💛 Final Thoughts
Healthy eating doesn’t have to be complicated.
Sometimes it’s just about combining:
✔️ simple ingredients
✔️ fresh flavors
✔️ balanced meals
And creating food you genuinely enjoy eating.
This is one of those meals you’ll come back to all summer long.

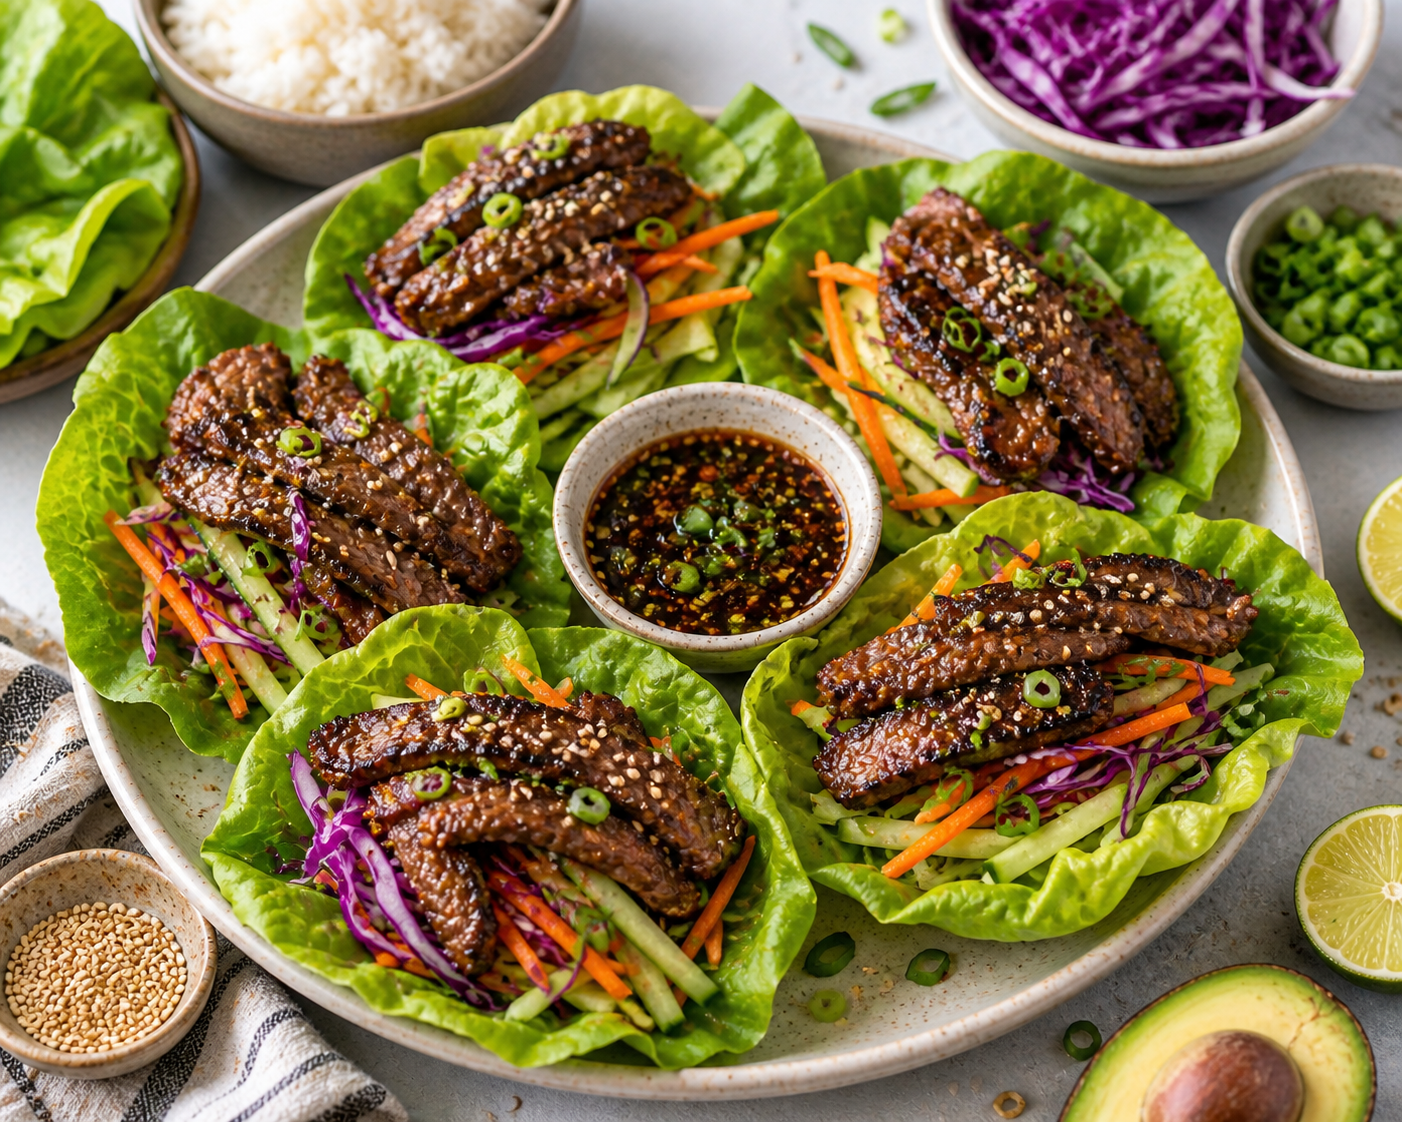
🥩🥒 Korean-Inspired Steak Lettuce Wraps
🌿 The Story
There’s a point when it gets hot out where you don’t want a full bowl…
You don’t want something heavy.
You don’t want to turn on the oven for an hour.
You just want something that feels:
🥬 light
🔥 flavorful
💪 still filling
And ideally… something you can eat with your hands 😄
That’s where this recipe comes in.
These Korean-Inspired Steak Lettuce Wraps are one of those meals that hit all the right notes:
bold, savory steak
fresh, crunchy veggies
a slightly sweet, garlicky sauce
wrapped up in crisp lettuce
It’s the kind of meal that feels fun, fresh, and different — without being complicated.
💪 Why You’ll Love This Recipe
✔️ Gluten-free & dairy-free
✔️ High protein
✔️ Light but super satisfying
✔️ Perfect for hot weather
✔️ Quick cook time
✔️ Family-friendly (everyone builds their own)
🥩 Korean-Inspired Steak Lettuce Wraps
⏱ Quick Stats
Prep Time: 15 minutes
Cook Time: 10 minutes
Total Time: 25 minutes
Serves: 4
🛒 Ingredients
Steak
1½ lbs flank steak or sirloin, thinly sliced
1 tbsp avocado oil
Korean-Inspired Sauce
¼ cup coconut aminos
1 tbsp honey
1 tsp sesame oil
3 cloves garlic, minced
1 tsp fresh ginger (or ½ tsp ground)
½ tsp chili flakes (optional)
Fresh Fillings
Butter lettuce or romaine leaves
1 cup shredded carrots
1 cup cucumber, thinly sliced
½ cup red cabbage, shredded
¼ cup green onion, sliced
Optional Add-Ons
Jasmine rice or cauliflower rice
Sesame seeds
Sliced avocado
Lime wedges
👩🍳 Easy Step-by-Step Instructions
Step 1: Make the Sauce
In a bowl, mix:
coconut aminos, honey, sesame oil, garlic, ginger, and chili flakes.
Set aside.
Step 2: Cook the Steak
Heat avocado oil in a skillet over medium-high heat.
Add thinly sliced steak and cook for 3–5 minutes until browned.
Step 3: Add the Sauce
Pour sauce over the steak and cook for another 2–3 minutes until slightly caramelized and glossy.
Remove from heat.
Step 4: Prep the Wraps
Wash and separate lettuce leaves.
Prep your veggies so everything is ready to go.
Step 5: Build Your Wraps
Add steak to lettuce leaves, then top with:
🥕 carrots
🥒 cucumber
🥬 cabbage
🧅 green onion
Step 6: Finish
Top with:
✨ sesame seeds
🥑 avocado
🍋 squeeze of lime
Fold and enjoy.
🔥 Meal Prep Tips
This one is great for the week:
✅ Cook steak ahead
✅ Store fillings separately
✅ Assemble fresh for best texture
☀️ Why This Recipe Works Right Now
When it’s hot, meals like this just make sense:
✔️ minimal cooking time
✔️ fresh + crunchy
✔️ bold flavor without heaviness
💛 Final Thoughts
Not every meal needs to be a bowl or a full plate.
Sometimes the best meals are:
✔️ simple
✔️ interactive
✔️ and just really good
And this is one of those recipes your whole family will get into.

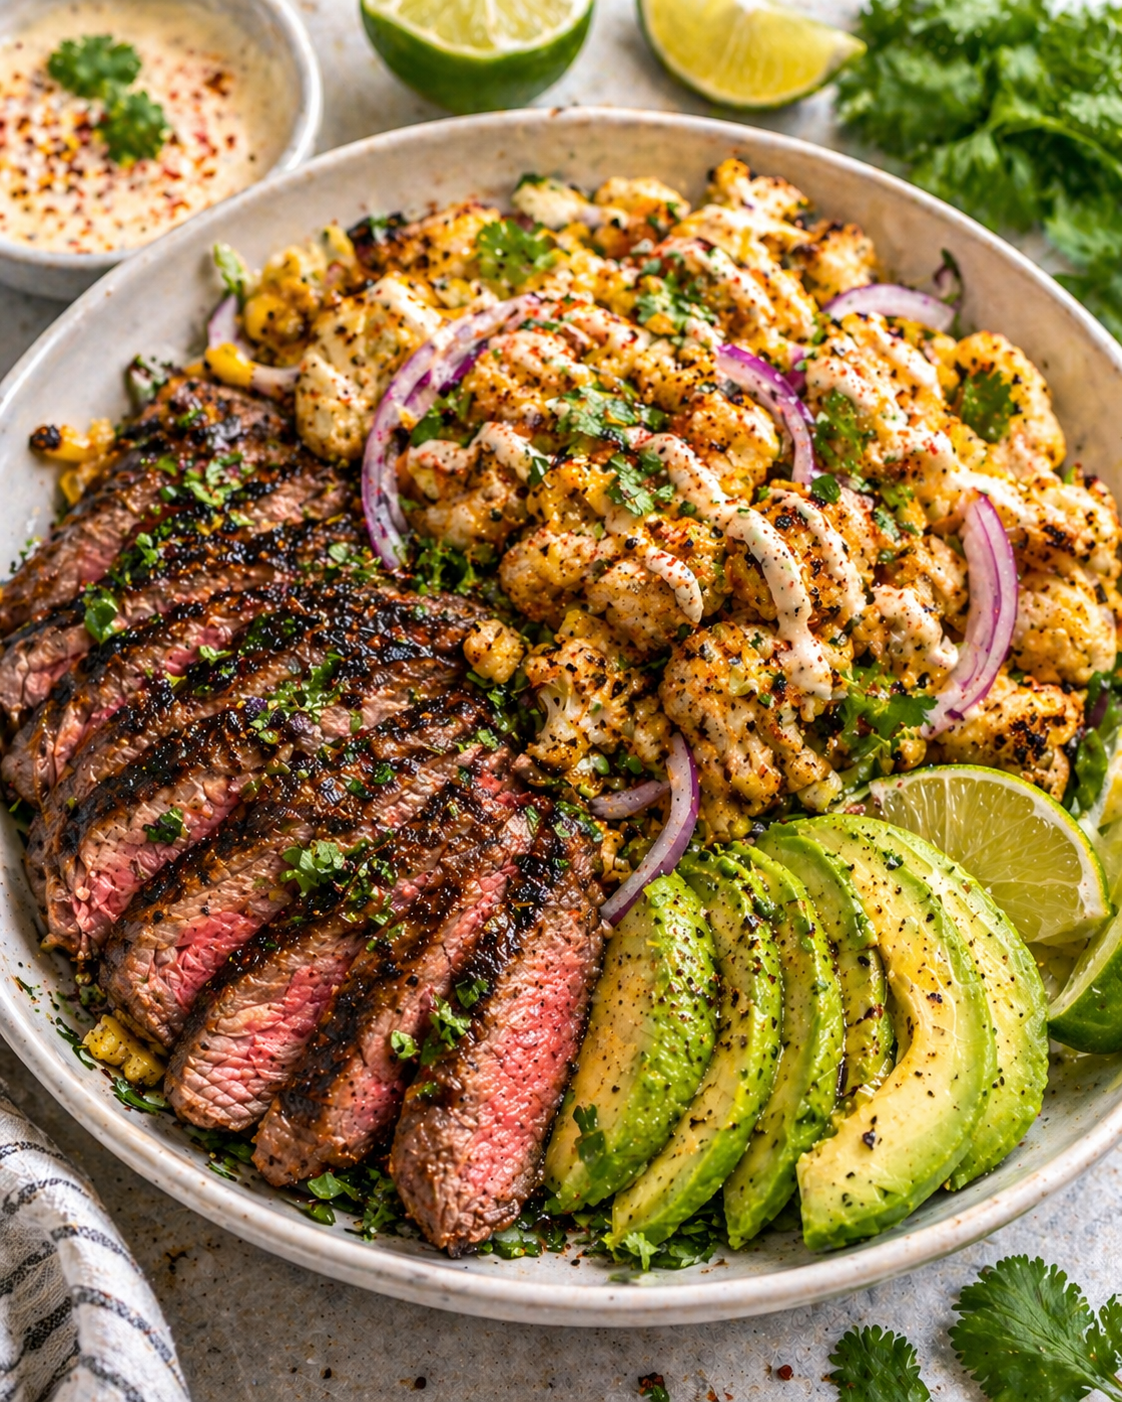
🥩🌽 Grilled Steak with Street Corn Cauliflower & Avocado
🌿 The Story
There’s something about this time of year that just calls for meals with a little more flavor.
Not heavier… just bolder.
Grilled food. Bright toppings. Fresh finishes.
Meals that feel like they belong outside — even if you’re just cooking in your kitchen.
But here’s the balance you’re trying to hit…
You want:
🔥 big flavor
🥗 clean ingredients
💪 something that actually fills you up
Without ending up in that “I need a nap after this” feeling.
That’s exactly what this dish does.
This Grilled Steak with Street Corn Cauliflower & Avocado gives you:
the richness of steak
the bold, slightly smoky flavor of street corn
and the freshness that keeps everything balanced
It’s one of those meals that feels like something you’d order at a great spot in the summer…
…but it’s simple enough to make any night of the week.
💪 Why You’ll Love This Recipe
✔️ Gluten-free & dairy-free
✔️ High protein
✔️ Bold, craveable flavor
✔️ Balanced (not heavy)
✔️ Great for meal prep
✔️ Feels elevated but easy
🥩 Grilled Steak with Street Corn Cauliflower & Avocado
⏱ Quick Stats
Prep Time: 15 minutes
Cook Time: 20 minutes
Total Time: 35 minutes
Serves: 4
🛒 Ingredients
Steak
1½–2 lbs flank steak or sirloin
1 tbsp olive oil
1 tsp sea salt
½ tsp black pepper
1 tsp garlic powder
Street Corn Cauliflower
1 large head cauliflower, cut into small florets
1 cup corn (fresh or frozen)
2 tbsp olive oil
1 tsp smoked paprika
½ tsp chili powder
½ tsp sea salt
Dairy-Free Street Corn Sauce
½ cup dairy-free mayo
1 tbsp lime juice
1 tsp chili powder
Pinch of salt
Fresh Add-Ins
1 avocado, sliced
¼ cup chopped cilantro
½ red onion, thinly sliced
Lime wedges
👩🍳 Easy Step-by-Step Instructions
Step 1: Prep the Steak
Rub steak with olive oil, salt, pepper, and garlic powder.
Let sit at room temp for 10–15 minutes.
Step 2: Roast the Cauliflower
Preheat oven to 425°F.
Toss cauliflower and corn with olive oil, paprika, chili powder, and salt.
Spread onto a sheet pan and roast for 20–25 minutes until tender and slightly charred.
Step 3: Make the Sauce
In a bowl, mix:
DF mayo, lime juice, chili powder, and salt.
Set aside.
Step 4: Cook the Steak
Grill or sear steak over medium-high heat
4–6 minutes per side depending on thickness.
Let rest, then slice against the grain.
Step 5: Build Your Plate
Plate:
roasted cauliflower + corn
sliced steak
avocado
Step 6: Finish Strong
Drizzle with street corn sauce and top with:
🌿 cilantro
🧅 red onion
🍋 fresh lime squeeze
🔥 Meal Prep Tips
This is a great one for the week:
✅ Cook steak medium for better reheating
✅ Store sauce separately
✅ Reheat cauliflower for best texture
☀️ Why This Recipe Works Right Now
As the weather warms up, you want meals that:
feel bold but not heavy
are satisfying without slowing you down
bring fresh flavor
This checks all those boxes.
💛 Final Thoughts
Healthy eating doesn’t have to mean boring meals.
Sometimes it just means:
✔️ better ingredients
✔️ bold flavor
✔️ simple execution
And this is one of those meals that makes it easy.

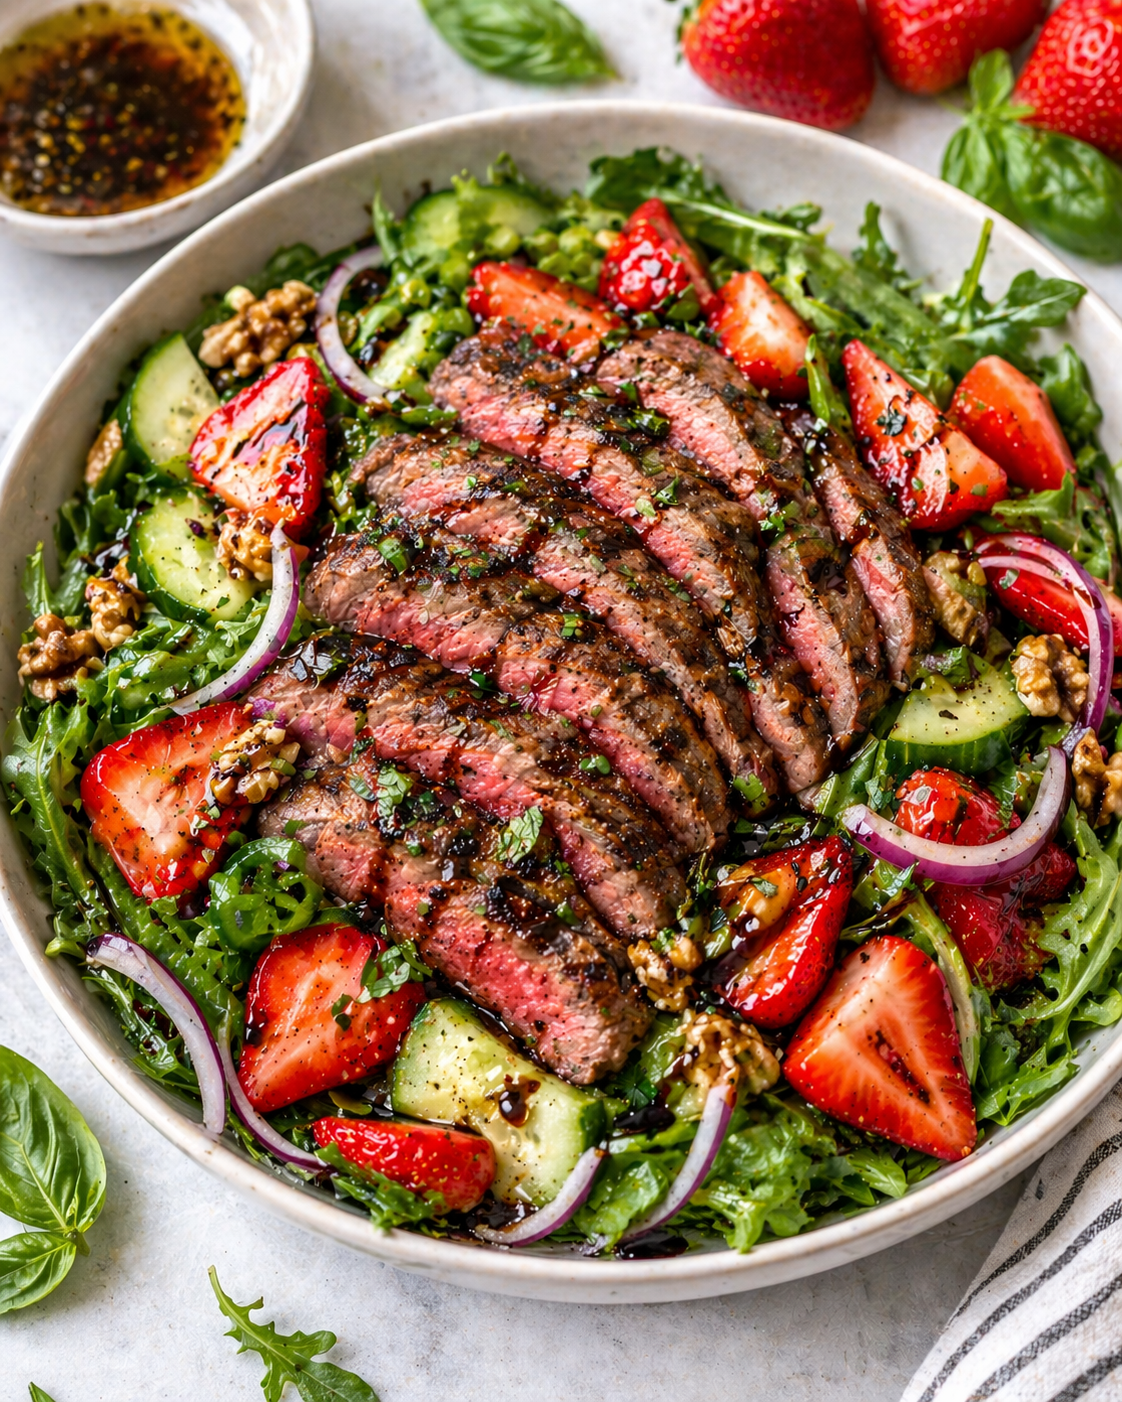
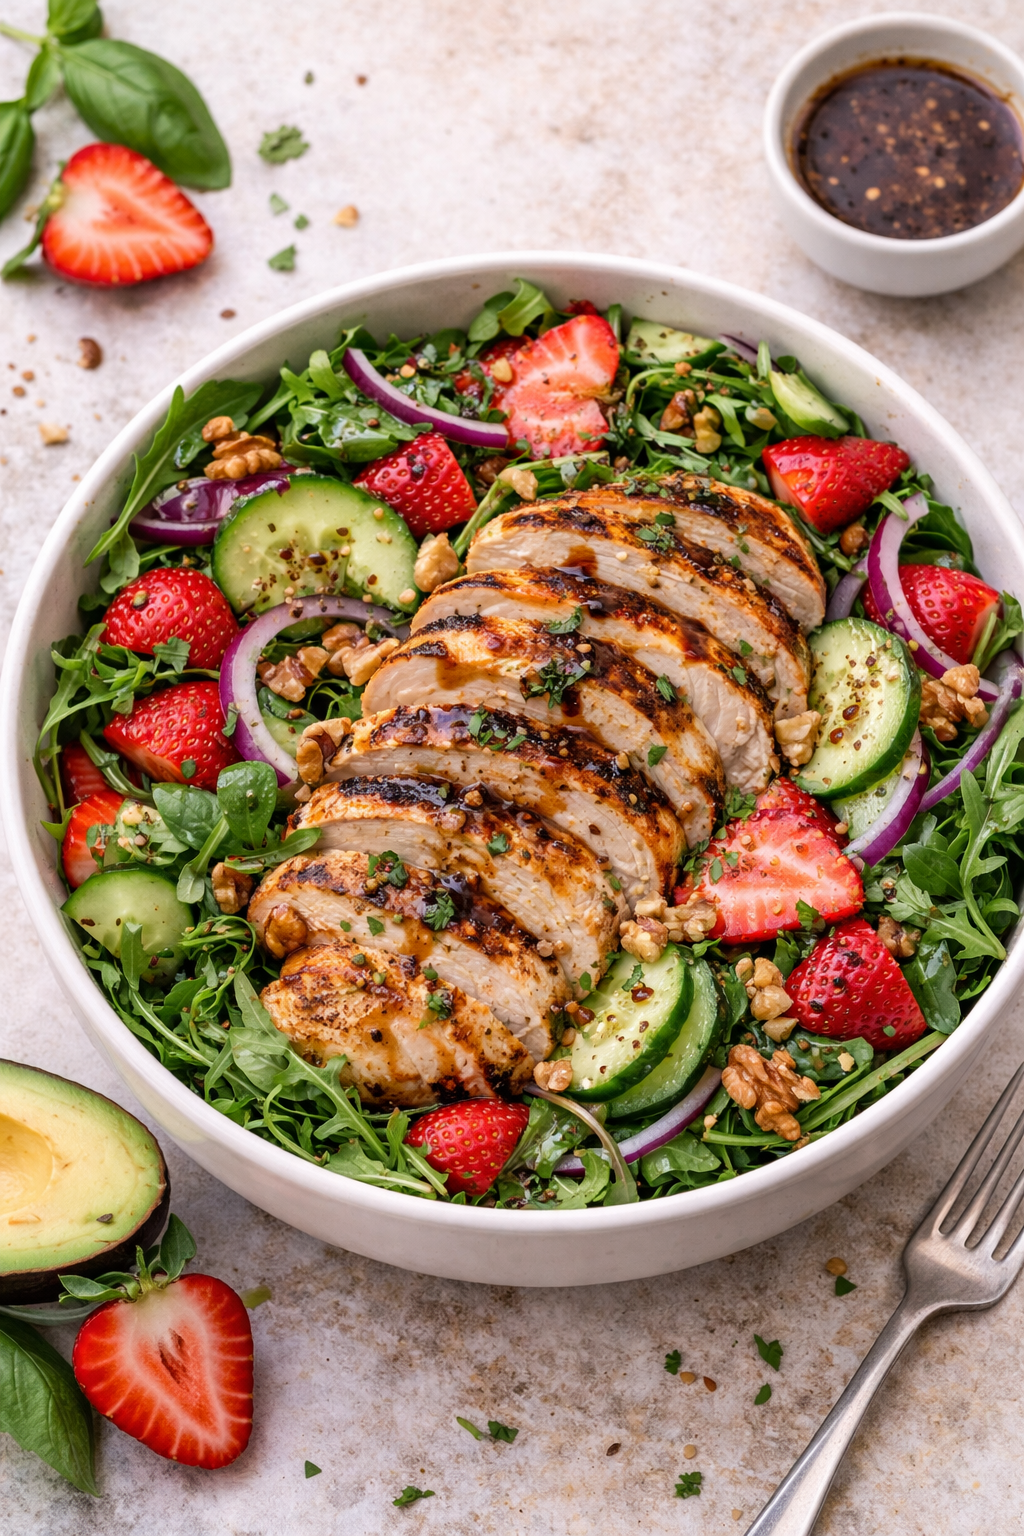
🥩🍓 Balsamic Steak & Strawberry Summer Salad
🌿 The Story
There’s a point when the weather starts heating up where steak either feels too heavy…
or it becomes something totally different.
Because when you pair it the right way — with fresh ingredients, bright flavors, and something a little unexpected — it turns into one of the best warm-weather meals you can make.
That’s exactly what this is.
This Balsamic Steak & Strawberry Summer Salad is one of those meals that feels:
☀️ light
🍓 fresh
🔥 still satisfying
It’s got that balance of:
savory grilled steak
sweet strawberries
crisp greens
a simple balsamic finish
And somehow it all just works.
It’s the kind of meal that feels like something you’d order at a great spot on a patio somewhere…
…but you can make it at home in under 30 minutes.
💪 Why You’ll Love This Recipe
✔️ Gluten-free & dairy-free
✔️ High protein
✔️ Light but filling
✔️ Sweet + savory combo (huge win)
✔️ Perfect for warm weather
✔️ Great for lunch or dinner
🥩 Balsamic Steak & Strawberry Summer Salad
⏱ Quick Stats
Prep Time: 10 minutes
Cook Time: 15 minutes
Total Time: 25 minutes
Serves: 4
🛒 Ingredients
Steak
1½–2 lbs flank steak or sirloin
1 tbsp olive oil
1½ tbsp balsamic vinegar
2 cloves garlic, minced
¾ tsp sea salt
¼ tsp black pepper (optional)
Salad Base
5–6 cups arugula or mixed greens
1½ cups fresh strawberries, sliced 🍓
½ cucumber, sliced
¼ red onion, thinly sliced
¼ cup chopped walnuts or pecans (optional)
Simple Balsamic Dressing
3 tbsp olive oil
1½ tbsp balsamic vinegar
1 tsp honey
Pinch of salt
Optional Add-Ins
Avocado
Fresh basil
DF cheese alternative
👩🍳 Easy Step-by-Step Instructions
Step 1: Prep the Steak
In a bowl, mix:
olive oil, balsamic vinegar, garlic, salt, and pepper.
Coat steak and let sit for 10–15 minutes.
Step 2: Cook the Steak
Cook in a skillet or grill over medium-high heat
4–6 minutes per side depending on thickness.
Let rest, then slice thin against the grain.
Step 3: Prep the Salad
While the steak cooks, slice:
strawberries
cucumber
red onion
Add greens to a large bowl.
Step 4: Make the Dressing
Whisk together:
olive oil, balsamic vinegar, honey, and salt.
Step 5: Build the Salad
Add:
sliced steak
strawberries
cucumber
onion
nuts
Step 6: Finish
Drizzle dressing over the top and toss lightly.
Add avocado or extras if using.
🔥 Meal Prep Tips
This one works surprisingly well:
✅ Store steak separate
✅ Keep dressing separate
✅ Assemble fresh for best texture
☀️ Why This Recipe Works Right Now
As it gets warmer, meals like this just make sense:
✔️ lighter feel
✔️ fresh ingredients
✔️ still satisfying
💛 Final Thoughts
This is one of those meals that reminds you:
Healthy eating doesn’t have to be boring.
Sometimes it’s just about combining the right flavors and keeping things simple.

🍋🍗 Lemon Basil Chicken with Roasted Summer Veggies
🌿 The Story
There’s a point every year where you just start craving cleaner, simpler meals.
Not because you’re trying to “diet”…
but because heavy food just doesn’t feel good anymore.
The weather’s warmer. You’re moving more. Life feels a little lighter.
And naturally, you want your food to match that.
But here’s the thing…
Simple meals can go one of two ways:
really fresh and flavorful
or really bland and forgettable
This one is not the second.
This Lemon Basil Chicken with Roasted Summer Veggies is one of those meals that feels:
☀️ light
🌿 fresh
🔥 flavorful
…but still satisfying enough to keep you full.
It’s built around simple ingredients — lemon, garlic, herbs, and roasted vegetables — but the combination just works.
And the best part?
👉 It’s easy enough to make on a busy weeknight
👉 Clean enough to keep you on track
👉 Good enough to actually crave again
💪 Why You’ll Love This Recipe
✔️ Gluten-free & dairy-free
✔️ Light but filling
✔️ High protein
✔️ Packed with fresh flavor
✔️ One-pan friendly
✔️ Perfect for meal prep
This is the kind of recipe that makes eating clean feel effortless.
🍋 Lemon Basil Chicken with Roasted Summer Veggies
⏱ Quick Stats
Prep Time: 10 minutes
Cook Time: 25 minutes
Total Time: 35 minutes
Serves: 4
🛒 Ingredients
Lemon Basil Chicken
1½ lbs chicken breast or thighs
2 tbsp olive oil
Zest + juice of 1 large lemon
3 cloves garlic, minced
½ cup fresh basil, chopped
¾ tsp sea salt
¼ tsp black pepper (optional)
Roasted Veggies
2 cups broccoli florets
1 zucchini, sliced
1 yellow squash, sliced
1 bell pepper, sliced
1 cup cherry tomatoes
1 tbsp olive oil
Pinch of salt
Optional Add-Ons
Jasmine rice
Quinoa
Cauliflower rice
Mixed greens
Optional Finish
Extra fresh basil
Lemon wedges
Red pepper flakes
👩🍳 Easy Step-by-Step Instructions
Step 1: Marinate the Chicken
In a bowl, combine:
olive oil, lemon zest + juice, garlic, basil, salt, and pepper.
Add chicken and let sit for 10–20 minutes (or longer if you have time).
Step 2: Roast the Veggies
Preheat oven to 425°F.
Toss veggies with olive oil + salt and spread onto a sheet pan.
Roast for 20–25 minutes until tender and slightly caramelized.
Step 3: Cook the Chicken
While veggies roast, cook chicken in a skillet over medium heat
5–6 minutes per side until cooked through.
Let rest, then slice.
Step 4: Build Your Plate
Serve chicken alongside roasted veggies or over your base of choice.
Step 5: Finish Strong
Top with:
🌿 fresh basil
🍋 extra lemon squeeze
🌶 optional heat
🔥 Meal Prep Tips
This one is super easy to carry through the week:
✅ Cook chicken ahead
✅ Roast a big batch of veggies
✅ Store separately for freshness
Mix and match for quick meals all week.
☀️ Why This Recipe Works Right Now
As it gets warmer, meals like this just hit differently.
You want:
fresh ingredients
simple prep
food that doesn’t weigh you down
And this gives you exactly that while still keeping you full and energized.
💛 Final Thoughts
Healthy eating doesn’t have to be complicated.
Sometimes it’s just about having a few simple meals that:
✔️ taste really good
✔️ make you feel good
✔️ fit into your real life
And this is one of those meals you’ll keep coming back to.

🌮🔥 Chipotle Lime Chicken Taco Bowls

🌵 The Story
There’s a certain point when the weather starts heating up where you don’t want to spend a ton of time in the kitchen…
But you also don’t want to fall into the trap of grabbing whatever’s quick and convenient.
Because usually, that leads to:
feeling sluggish
meals that don’t actually satisfy
and being off track before the week even really starts
What you actually need is a go-to meal that checks all the boxes:
✔️ fast
✔️ full of flavor
✔️ filling
✔️ and made with real ingredients
And that’s exactly where these Chipotle Lime Chicken Taco Bowls come in.
They’ve got that bold, slightly smoky, citrusy flavor you’d expect from your favorite taco spot…
…but made clean, simple, and totally customizable for your week.
It’s one of those meals you’ll make once… and then keep coming back to.
💪 Why You’ll Love This Recipe
This isn’t just another “healthy bowl.”
This is the kind of meal that actually makes staying consistent easier:
✔️ Gluten-free & dairy-free
✔️ High protein + balanced
✔️ Big flavor without heavy sauces
✔️ Great for meal prep
✔️ Family-friendly
✔️ Totally customizable
🌮 Chipotle Lime Chicken Taco Bowls
⏱ Quick Stats
Prep Time: 10 minutes
Cook Time: 20 minutes
Total Time: 30 minutes
Serves: 4
🛒 Ingredients
Chipotle Lime Chicken
1½ lbs chicken thighs or breast
2 tbsp avocado oil
Zest + juice of 2 limes
2 cloves garlic, minced
1–2 tsp chipotle powder (adjust heat level)
1 tsp smoked paprika
½ tsp cumin
¾ tsp sea salt
Bowl Base + Fillings
2 cups cooked jasmine rice or cilantro lime rice
1 cup black beans (optional)
1 cup corn (fresh or roasted)
1 cup shredded lettuce or cabbage
1 bell pepper, sliced
1 avocado, sliced
Simple Fresh Toppings
Fresh cilantro
Lime wedges
Red onion, thinly sliced
Jalapeños (optional)
Optional Sauce (DF Chipotle Lime Drizzle)
½ cup dairy-free mayo
1 tbsp lime juice
1 tsp chipotle powder
Pinch of salt
👩🍳 Easy Step-by-Step Instructions
Step 1: Marinate the Chicken
In a bowl, mix:
avocado oil, lime zest + juice, garlic, chipotle powder, paprika, cumin, and salt.
Add chicken and let sit for 10–20 minutes (or longer if you have time).
Step 2: Cook the Chicken
Cook in a skillet over medium heat for
5–6 minutes per side until cooked through.
Let rest, then slice or chop.
Step 3: Prep the Bowl Ingredients
While the chicken cooks:
cook rice if needed
slice peppers
prep toppings
Step 4: Build Your Bowls
Start with your base, then layer:
chipotle lime chicken
beans
corn
lettuce/cabbage
peppers
avocado
Step 5: Finish Strong
Top with:
🌿 cilantro
🍋 fresh lime
🌶 jalapeños
🔥 drizzle sauce (optional)
🔥 Meal Prep Tips (This Is Where It Wins)
If you want this to carry you through the week:
✅ Cook chicken in bulk
✅ Prep rice + toppings ahead
✅ Store components separately
Then just build your bowl fresh in minutes.
☀️ Why This Recipe Works Right Now
As it starts getting warmer, you want meals that:
don’t feel heavy
are quick to make
still bring big flavor
This recipe gives you that perfect balance of:
✔️ bold + fresh
✔️ simple + satisfying
✔️ clean + craveable
💛 Final Thoughts
Healthy eating doesn’t have to be complicated.
Sometimes it’s just about having a few go-to meals that:
✔️ taste really good
✔️ fit your schedule
✔️ and help you stay consistent
And this is one of those meals.

🍓🌿 Strawberry Balsamic Chicken Salad
There’s something about this time of year that just shifts everything.
The weather starts warming up…
the days feel a little longer…
and suddenly, the heavy meals you’ve been eating all winter just don’t sound as good anymore.
You don’t want something heavy.
You want something that feels:
☀️ fresh
🥗 light
💪 still filling
But here’s the problem…
Most salads don’t actually check all those boxes.
They either:
leave you hungry an hour later
feel boring and repetitive
or just don’t have enough flavor to make you want to eat them again
And that’s where this one is different.
Because this Strawberry Balsamic Chicken Salad isn’t just a salad you eat because it’s “healthy”…
it’s one you actually look forward to.
It’s got:
🍓 natural sweetness from fresh strawberries
🔥 savory, juicy balsamic chicken
🥒 crisp, refreshing veggies
🥗 a simple dressing that ties everything together
Every bite hits that balance of sweet, savory, and fresh — and it just works.
Why You’ll Love This Recipe
This is one of those meals that makes eating clean feel easy:
✔️ Gluten-free & dairy-free
✔️ High protein + satisfying
✔️ Light but not lacking
✔️ Packed with flavor and texture
✔️ Perfect for lunch or dinner
✔️ Great for warmer weather
It’s the kind of recipe you can throw together quickly…
but still feels like something special.
🍓 Strawberry Balsamic Chicken Salad
⏱ Quick Stats
Prep Time: 10 minutes
Cook Time: 15 minutes
Total Time: 25 minutes
Serves: 4
🛒 Ingredients
Balsamic Chicken
1½ lbs chicken breast
2 tbsp olive oil
2 tbsp balsamic vinegar
2 cloves garlic, minced
½ tsp sea salt
¼ tsp black pepper (optional)
Salad Base
5–6 cups mixed greens or arugula
1½ cups fresh strawberries, sliced 🍓
½ red onion, thinly sliced
½ cup cucumber, sliced
¼ cup chopped walnuts or pecans (optional)
Simple Balsamic Dressing
3 tbsp olive oil
1½ tbsp balsamic vinegar
1 tsp honey
Pinch of salt
Optional Add-Ins
Avocado slices
Dairy-free cheese alternative
Fresh basil
👩🍳 Easy Step-by-Step Instructions
Step 1: Cook the Chicken
In a bowl, mix:
olive oil, balsamic vinegar, garlic, salt, and pepper.
Add the chicken and let it sit for 10–15 minutes if you have time.
Cook in a skillet or on a grill over medium heat for
5–6 minutes per side, until cooked through.
Let rest, then slice.
Step 2: Prep the Salad
While the chicken cooks, slice:
strawberries
cucumber
red onion
Add your greens to a large bowl.
Step 3: Make the Dressing
In a small bowl, whisk together:
olive oil
balsamic vinegar
honey
pinch of salt
Simple, clean, and just enough to bring everything together.
Step 4: Build the Salad
Top the greens with:
sliced chicken
strawberries
cucumber
red onion
nuts (if using)
Step 5: Finish Strong
Drizzle dressing over the top and toss lightly.
Add any extras like:
🥑 avocado
🌿 fresh herbs
Serve immediately and enjoy.
🔥 Meal Prep Tips (This is Where It Wins)
If you want to use this for the week:
✅ Cook chicken ahead of time
✅ Store dressing separately
✅ Keep greens + toppings fresh
Then just assemble when you’re ready.
You’ll have a fresh, satisfying meal in under 2 minutes.
Why This Recipe Works Right Now ☀️
As the weather warms up, your body naturally craves:
lighter meals
fresher ingredients
meals that don’t slow you down
This recipe gives you all of that — while still keeping you full and energized.
It’s the perfect balance of:
✔️ clean ingredients
✔️ real flavor
✔️ practical simplicity
Final Thoughts 💛
Healthy eating doesn’t have to feel restrictive.
Sometimes it’s just about finding meals that:
✔️ taste really good
✔️ make you feel good
✔️ and fit into your everyday life
And this is one of those meals you’ll come back to again and again.
🌿🍤 Cilantro Lime Shrimp Bowls

There’s a certain point in the year where everything shifts.
The weather warms up. The days get longer. And suddenly…
you don’t want heavy meals anymore.
You want something that feels:
☀️ fresh
🥗 light
💪 still filling
But here’s the problem…
Most quick meals either:
don’t have enough protein
don’t actually keep you full
or just feel like a random mix of ingredients thrown in a bowl
And that’s exactly why this recipe works.
These Cilantro Lime Shrimp Bowls are one of those meals that come together fast…
but feel like something you’d order on vacation.
Bright citrus, garlic, fresh herbs, crunchy veggies, and perfectly cooked shrimp — all layered into one bowl that actually satisfies.
And the best part?
You can make it in about 20 minutes start to finish.
Why You’ll Love This Recipe
This is the kind of meal that helps you stay consistent without overthinking it:
✔️ Gluten-free & dairy-free
✔️ High protein + light feel
✔️ Fresh, bright flavors
✔️ Super quick (perfect for busy nights)
✔️ Great for meal prep
✔️ Easy to customize
🍤 Cilantro Lime Shrimp Bowls
⏱ Quick Stats
Prep Time: 10 minutes
Cook Time: 10 minutes
Total Time: 20 minutes
Serves: 4
🛒 Ingredients
Cilantro Lime Shrimp
1 lb large shrimp, peeled & deveined
2 tbsp olive oil or avocado oil
3 cloves garlic, minced
Zest + juice of 1–2 limes
½ tsp cumin
¾ tsp sea salt
¼ tsp black pepper (optional)
¼ cup fresh cilantro, chopped
Fresh Bowl Ingredients
2 cups shredded cabbage or slaw mix
1 cup shredded carrots
1 cup cucumber, sliced
1 bell pepper, sliced
1 avocado, sliced
Base Options
Jasmine rice
Cilantro lime rice
Cauliflower rice
Mixed greens
Optional Toppings
Extra cilantro
Lime wedges
Chili flakes
Jalapeño slices
Simple DF lime crema (optional)
👩🍳 Easy Step-by-Step Instructions
Step 1: Prep the Shrimp
In a bowl, toss shrimp with:
olive oil, garlic, lime zest + juice, cumin, salt, and pepper.
Let sit for 5–10 minutes while you prep everything else.
Step 2: Cook the Shrimp
Heat a skillet over medium-high heat.
Add shrimp in a single layer and cook:
2–3 minutes per side, until pink and opaque.
Remove from heat and toss with fresh cilantro.
👉 Don’t overcook — shrimp cook fast!
Step 3: Prep the Bowl Ingredients
While the shrimp cooks, slice and prep:
cabbage
carrots
cucumber
bell pepper
avocado
Keep everything fresh and crisp.
Step 4: Build Your Bowls
Start with your base.
Then layer:
shrimp
cabbage
carrots
cucumber
bell pepper
avocado
Step 5: Finish Strong
Top with:
🌿 extra cilantro
🍋 fresh lime squeeze
🌶 chili flakes or jalapeño
Optional: drizzle with a quick dairy-free lime sauce if you want extra flavor.
🔥 Meal Prep Tips (This is Where It Wins)
If you want this to carry you through the week:
✅ Cook shrimp fresh or slightly under for reheating
✅ Store veggies separately for crunch
✅ Add avocado fresh when serving
You can build a fresh bowl in under 2 minutes.
Why This Recipe Works Right Now ☀️
As it gets warmer, your body naturally craves:
lighter meals
fresher ingredients
quicker cooking
This recipe checks every box while still giving you:
✔️ enough protein to stay full
✔️ enough flavor to stay satisfied
✔️ enough simplicity to stay consistent
Final Thoughts 💛
Healthy eating doesn’t need to be complicated.
Sometimes it’s just about having a few go-to meals that:
✔️ taste good
✔️ make you feel good
✔️ fit into your real life
And this is one of those meals you’ll come back to again and again.
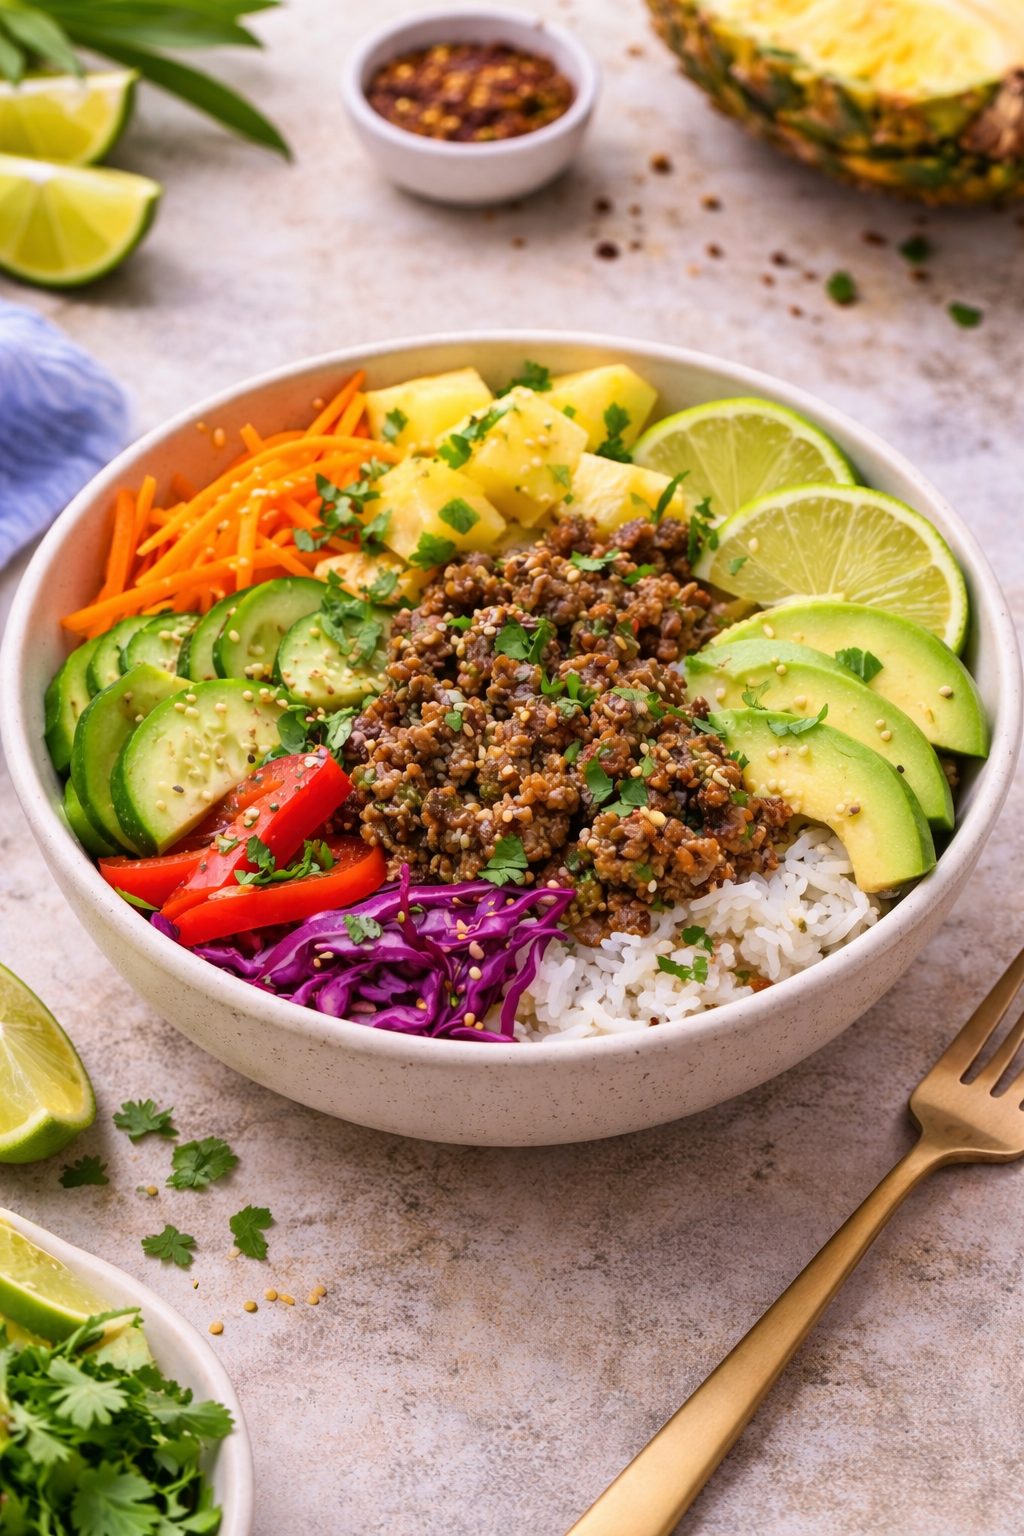
🌴🍍 Tropical Honey Garlic Beef Bowls

There’s always that moment this time of year…
When the weather starts warming up, the days feel a little longer, and suddenly the heavy comfort meals just don’t sound as good anymore.
You don’t want something that sits heavy.
You want something that feels:
☀️ fresh
🥗 light
💪 still filling
But here’s the challenge…
Most “healthy” meals that are light end up being either:
not filling enough
boring
or something you eat once and never want again
And that’s where meals like this come in.
Because this bowl hits that perfect middle ground —
fresh and energizing, but still satisfying enough to keep you full.
These Tropical Honey Garlic Beef Bowls are one of those meals that feel like something you’d grab on vacation…
Something bright, colorful, and full of flavor.
But instead of waiting for a beach trip, you can make it in your kitchen in under 30 minutes.
Why You’ll Love This Recipe
This isn’t just another “healthy bowl.”
This is the kind of meal that actually helps you stay consistent because it’s:
✔️ Gluten-free & dairy-free
✔️ High protein + balanced carbs
✔️ Sweet + savory + fresh
✔️ Loaded with texture and color
✔️ Meal prep friendly
✔️ Family-approved
It’s the kind of recipe that makes eating clean feel easy — not restrictive.
🍍 Tropical Honey Garlic Beef Bowls
⏱ Quick Stats
Prep Time: 10 minutes
Cook Time: 20 minutes
Total Time: 30 minutes
Serves: 4
🛒 Ingredients
Honey Garlic Beef
1 lb ground beef (or turkey for a lighter option)
1 tbsp avocado oil
3 cloves garlic, minced
1 tsp fresh ginger (or ½ tsp ground)
¼ cup coconut aminos
2 tbsp honey
1 tbsp lime juice
½ tsp sea salt
¼ tsp black pepper (optional)
Fresh + Crunchy Add-Ins
1 cup pineapple chunks (fresh or grilled) 🍍
1 cup shredded carrots
1 bell pepper, sliced
1 cup cucumber, sliced
1 cup zucchini (lightly sautéed or raw)
2 cups shredded cabbage or slaw mix
Base Options
Jasmine rice
Coconut rice (highly recommend for flavor)
Cauliflower rice
Mixed greens for a lighter option
Optional Toppings
Green onion
Fresh cilantro
Sesame seeds
Chili flakes or hot sauce
Avocado slices
👩🍳 Easy Step-by-Step Instructions
Step 1: Cook the Beef
Heat 1 tbsp avocado oil in a large skillet over medium heat.
Add the ground beef and cook for 5–6 minutes, breaking it up as it browns.
Step 2: Build the Flavor
Add garlic and ginger and cook for about 1 minute until fragrant.
Then stir in:
coconut aminos
honey
lime juice
salt and pepper
Let it simmer for 2–3 minutes until slightly thickened and glossy.
Step 3: Prep the Fresh Ingredients
While the beef cooks, prep your bowl ingredients:
slice cucumber, shred carrots, slice peppers, and get your pineapple ready.
🔥 Pro tip: If you have time, grill or sear the pineapple for 2–3 minutes per side — it adds incredible flavor.
Step 4: Build Your Bowls
Start with your base of choice.
Then layer:
honey garlic beef
cabbage/slaw
carrots
cucumber
bell pepper
pineapple
Step 5: Finish Strong
Top with:
🌿 cilantro
🥑 avocado
🌶 chili flakes
🍋 extra lime squeeze
This is where the bowl really comes to life.
🔥 Meal Prep Tips (This is Where It Wins)
If you’re trying to stay consistent this week, this recipe makes it easy:
✅ Cook beef ahead of time
✅ Prep veggies and store separately
✅ Add fresh toppings when serving
You can build a fresh bowl in under 2 minutes all week.
Why This Recipe Works for Warmer Weather ☀️
When it starts heating up, your body naturally craves:
lighter meals
more fresh foods
balanced flavors
This bowl delivers all of that while still giving you:
✔️ enough protein to stay full
✔️ enough carbs for energy
✔️ enough flavor to keep you coming back
Final Thoughts 💛
Healthy eating doesn’t need to feel heavy, complicated, or restrictive.
Sometimes it’s just about finding meals that:
✔️ taste good
✔️ make you feel good
✔️ and fit into your real life
This is one of those meals.
Fresh, simple, and something you’ll actually look forward to eating again tomorrow.
And those are the meals that make the biggest difference.
Garlic Herb Shrimp & Veggie Sheet Pan Dinner 🍤🌿
Some nights you want to cook a great meal.
Other nights… you just want dinner to magically appear with minimal effort and minimal dishes.
If you’ve ever looked at your kitchen at the end of the day and thought “I cannot deal with a sink full of pans tonight,” this recipe is exactly what you need.
That’s why I love a good sheet pan dinner.
You toss everything on one tray, slide it into the oven, and suddenly you’ve got a colorful, healthy meal that looks like you put in way more effort than you actually did.
This Garlic Herb Shrimp & Veggie Sheet Pan Dinner has quickly become one of those go-to meals in our house when we want something that feels fresh and satisfying but doesn’t require a ton of prep.
It’s loaded with vibrant veggies, juicy shrimp, and simple garlic herb seasoning that makes the whole kitchen smell amazing while it cooks.
Best part?
It’s naturally gluten-free, dairy-free, and packed with clean ingredients that leave you feeling energized instead of heavy.
And when dinner only requires one pan, that’s always a win.
Why You’ll Love This Recipe
This sheet pan dinner checks every box:
✔️ Quick to prep (about 10 minutes)
✔️ One pan = easy cleanup
✔️ Naturally gluten-free & dairy-free
✔️ Loaded with colorful vegetables
✔️ High protein and light but satisfying
✔️ Perfect for busy weeknights
It’s also incredibly flexible, so you can swap in whatever veggies you already have in your fridge.
Garlic Herb Shrimp & Veggie Sheet Pan Dinner
⏱ Quick Stats
Prep Time: 10 minutes
Cook Time: 12–15 minutes
Total Time: 25 minutes
Serves: 4
Ingredients
Shrimp
1 lb large shrimp, peeled and deveined
2 tbsp olive oil
3 cloves garlic, minced
1 tsp dried oregano
1 tsp dried parsley
½ tsp paprika
¾ tsp sea salt
¼ tsp black pepper (optional)
Juice of ½ lemon
Veggies
1 zucchini, sliced
1 bell pepper, sliced
1 cup cherry tomatoes
½ red onion, sliced
1 cup broccoli florets
Optional Garnish
Fresh parsley
Lemon wedges
Easy Step-by-Step Instructions
Step 1: Preheat the Oven
Preheat your oven to 425°F.
Line a large sheet pan with parchment paper or lightly grease it for easier cleanup.
Step 2: Prep the Veggies
Spread the zucchini, bell pepper, tomatoes, red onion, and broccoli evenly across the sheet pan.
Drizzle with 1 tablespoon olive oil and sprinkle lightly with salt.
Toss gently so everything is coated.
Step 3: Roast the Vegetables
Place the sheet pan in the oven and roast the vegetables for 8 minutes.
This gives them a head start so they come out perfectly tender.
Step 4: Season the Shrimp
While the vegetables roast, add the shrimp to a bowl and toss with:
remaining olive oil
minced garlic
oregano
parsley
paprika
salt and pepper
lemon juice
Make sure the shrimp are evenly coated.
Step 5: Add Shrimp to the Pan
Remove the sheet pan from the oven and spread the shrimp evenly among the vegetables.
Return the pan to the oven and cook for 5–7 minutes, until the shrimp are pink and opaque.
Be careful not to overcook them — shrimp cook quickly!
Step 6: Finish and Serve
Remove the pan from the oven and sprinkle with fresh parsley and an extra squeeze of lemon.
Serve immediately.
Serving Ideas
This dish is great on its own, but it also pairs well with:
Cauliflower rice for a lighter option
Jasmine rice if you want something more filling
Quinoa for added protein
Or simply a fresh side salad
Easy Meal Prep Tip
If you want to prep this meal ahead of time:
✔️ Chop your vegetables and store them in a container
✔️ Mix the shrimp marinade in advance
✔️ When dinner time comes, just toss everything on the pan and bake
Dinner can be ready in under 20 minutes.
Final Thoughts
Healthy eating doesn’t have to mean complicated recipes or long prep times.
Sometimes the best meals are the simplest ones — fresh ingredients, bold flavor, and minimal cleanup.
This Garlic Herb Shrimp & Veggie Sheet Pan Dinner is the perfect reminder that eating well can be easy, delicious, and completely doable on even the busiest nights.
If you try this recipe, let me know what veggie combinations you use — it’s always fun seeing how people make it their own.

Sticky Ginger Garlic Chicken Bowls 🍯🧄🥢
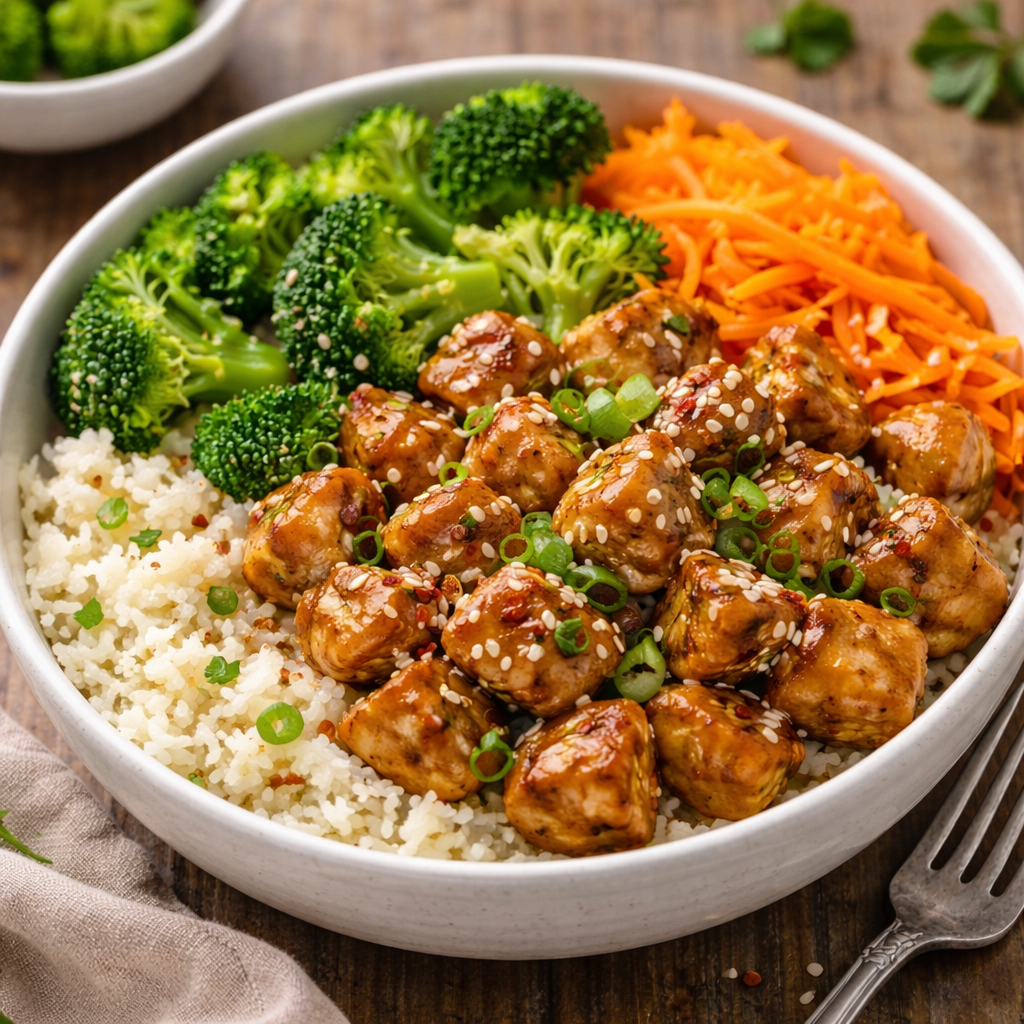
There are some meals that just make the week easier.
You know the kind — simple ingredients, quick to cook, and packed with enough flavor that everyone at the table is excited to eat it again the next day.
These Sticky Ginger Garlic Chicken Bowls have become one of those go-to meals in our house.
They’re savory, a little sweet, and full of bold flavor from fresh ginger, garlic, and coconut aminos. When the sauce hits the hot pan it reduces into a light glaze that coats the chicken perfectly, giving you that irresistible “sticky” texture you usually only get from takeout.
But the best part?
This meal is made with clean ingredients, comes together in about 30 minutes, and leaves you feeling energized instead of weighed down.
It’s a weeknight win — the kind of recipe that makes healthy eating feel easy.
Why This Recipe Works
This bowl hits that perfect balance between comfort food and clean eating:
✔️ High protein to keep you full
✔️ Naturally gluten-free and dairy-free
✔️ Bold flavor without heavy sauces
✔️ Perfect for meal prep lunches
✔️ Easy to customize with whatever vegetables you have on hand
It’s simple, flexible, and satisfying — exactly the kind of meal that works for busy weeks.
🍯 Sticky Ginger Garlic Chicken Bowls
Quick Stats
Prep Time: 10 minutes
Cook Time: 20 minutes
Total Time: ~30 minutes
Serves: 4
Ingredients
Chicken
1½ lbs boneless chicken thighs or breasts, diced
1 tbsp avocado oil
½ tsp sea salt
Ginger Garlic Sauce
¼ cup coconut aminos
1 tbsp honey or maple syrup
1 tbsp fresh ginger, grated
3 cloves garlic, minced
1 tsp rice vinegar or lime juice
1 tsp sesame oil
Bowl Base
Choose your favorite:
Jasmine rice
Brown rice
Cauliflower rice
Vegetables
2 cups steamed broccoli
1 cup shredded carrots
Optional Toppings
Sliced green onions
Sesame seeds
Chili flakes
Step-by-Step Instructions
1. Cook the Chicken
Heat avocado oil in a skillet over medium-high heat.
Add the diced chicken, season with salt, and cook for 6–8 minutes, stirring occasionally, until browned and fully cooked.
2. Make the Ginger Garlic Sauce
In a small bowl whisk together:
coconut aminos
honey or maple syrup
grated ginger
minced garlic
rice vinegar or lime juice
sesame oil
This combination creates a savory sauce with just enough sweetness and brightness.
3. Build the Sticky Glaze
Pour the sauce into the skillet with the cooked chicken.
Cook for 2–3 minutes, stirring frequently, until the sauce thickens slightly and coats the chicken.
The sauce will reduce and create that sticky glaze that makes this dish so good.
4. Assemble the Bowls
Start with your base of rice or cauliflower rice.
Top with:
sticky ginger garlic chicken
steamed broccoli
shredded carrots
Finish with green onions, sesame seeds, and chili flakes if you like a little heat.
Serving Ideas
One of the best things about this recipe is how flexible it is.
You can easily swap or add vegetables like:
bell peppers
snap peas
zucchini
cabbage
mushrooms
It’s also great as a build-your-own bowl dinner where everyone adds their favorite toppings.
Meal Prep Tips
This recipe works great for meal prep:
✔️ Chicken keeps 3–4 days in the fridge
✔️ Store toppings separately for best texture
✔️ Reheats easily for quick lunches
You can even double the chicken and use it in wraps, salads, or lettuce cups later in the week.
Final Thoughts
Healthy meals don’t have to be bland or complicated.
Sometimes the best recipes are the ones that use simple ingredients, cook quickly, and still feel exciting enough that you’re happy to make them again next week.
These Sticky Ginger Garlic Chicken Bowls check all those boxes — bold flavor, clean ingredients, and a meal that fits into real life.
If you try this one, let me know what veggies you added to your bowl — I’m always curious what combinations people come up with.

Cilantro Lime Chicken Taco Bowls 🌮🍋
here’s a reason taco night is always a win.
It’s flexible. It’s flavorful. And somehow everyone at the table can make it their own without turning dinner into a short-order kitchen situation.
That’s exactly why these Cilantro Lime Chicken Taco Bowls have become one of my favorite go-to meals when we want something fresh, satisfying, and healthy without spending a ton of time in the kitchen.
They’ve got bright citrus flavor, juicy seasoned chicken, plenty of texture from the toppings, and just enough richness from avocado to make the whole bowl feel complete.
It’s the kind of meal that tastes like takeout…
but leaves you feeling energized instead of sluggish.
Why This Recipe Works So Well
These taco bowls hit that perfect balance between comfort and clean eating:
High protein to keep you full and fueled
Fresh lime + herbs to keep it light
Naturally gluten-free and dairy-free
Easy to prep ahead for lunches
Customizable for kids, picky eaters, or different goals
It’s simple food that supports your routine instead of complicating it.
🌮 Cilantro Lime Chicken Taco Bowls
⏱ Quick Stats
Prep Time: 10 minutes
Cook Time: 20 minutes
Total Time: ~30 minutes
Serves: 4
🛒 Ingredients
Cilantro Lime Chicken
1½ lbs boneless chicken thighs or breasts, diced
1 tbsp olive or avocado oil
Juice of 1 large lime
Zest of 1 lime
2 cloves garlic, minced
1 tsp cumin
1 tsp chili powder
¾ tsp sea salt
Bowl Base Options
Cauliflower rice
White or brown rice
Shredded lettuce or mixed greens
Toppings
1 cup cherry tomatoes, halved
1 avocado, sliced
½ cup red onion, thinly sliced
Fresh cilantro
Lime wedges
Optional Dairy-Free Lime Drizzle
½ cup dairy-free yogurt or cashew crema
1 tbsp lime juice
Pinch of salt
👩🍳 Easy Step-by-Step Instructions
Step 1: Marinate the Chicken
In a bowl, toss the chicken with oil, lime juice, zest, garlic, cumin, chili powder, and salt.
Let it sit while you prep your toppings — even 5–10 minutes helps the flavor soak in.
Step 2: Cook the Chicken
Heat a skillet over medium-high heat.
Add the chicken and cook for 6–8 minutes, stirring occasionally, until browned and cooked through.
Step 3: Make the Lime Drizzle (Optional but Recommended)
Whisk together the dairy-free yogurt (or cashew crema), lime juice, and salt until smooth.
Taste and adjust lime or salt as needed.
Step 4: Build Your Bowls
Start with your base, then add:
cilantro lime chicken
tomatoes
avocado
red onion
fresh cilantro
Drizzle with the lime sauce and finish with a squeeze of fresh lime.
🍽 How to Serve These Bowls
This recipe is incredibly flexible:
Use cauliflower rice for a lighter option
Add regular rice for a heartier meal
Swap in greens for a taco salad vibe
Add roasted peppers, corn, or beans if desired
🔥 Meal Prep Tips
Chicken keeps well for 3–4 days in the fridge
Store toppings separately for best texture
Great for grab-and-go lunches
Final Thoughts 💛
Healthy eating doesn’t have to mean complicated meals or restrictive rules.
Sometimes it’s just about building a bowl that tastes good, fuels your body, and fits into real life — and these Cilantro Lime Chicken Taco Bowls do exactly that.
If you try them, let me know what base you used — I’m always curious how everyone builds their bowl 🌮✨

🍲 Golden Turmeric Chicken Stew
There’s a certain kind of dinner you crave when the week starts feeling long.
Not something heavy.
Not something complicated.
Just something warm, nourishing, and satisfying enough to feel like a real meal.
That’s exactly where this Golden Turmeric Chicken Stew comes in.
It’s the kind of dish that feels comforting without being overly rich, filling without being heavy, and packed with ingredients that actually make you feel good after you eat. The turmeric gives it that beautiful golden color, the ginger and garlic add depth, and the coconut milk brings just enough creaminess to tie everything together.
It’s cozy food — but the kind that supports your energy instead of draining it.
Why This Recipe Works So Well
This stew hits that sweet spot between comfort food and clean eating:
High-protein to keep you full
Anti-inflammatory ingredients like turmeric, garlic, and ginger
Naturally gluten-free and dairy-free
Packed with vegetables without feeling like “diet food”
Perfect for meal prep or leftovers
It’s simple enough for a weeknight but nourishing enough to feel intentional.
🍲 Golden Turmeric Chicken Stew
⏱ Quick Stats
Prep Time: 15 minutes
Cook Time: 30 minutes
Total Time: ~45 minutes
Serves: 4–5
🛒 Ingredients
Base
1½ lbs boneless chicken thighs or breast, cubed
1 tbsp olive or avocado oil
1 small onion, diced
3 cloves garlic, minced
1 tbsp fresh ginger, grated
Veggies
2 carrots, sliced
1 zucchini, diced
1 cup green beans or broccoli
1 cup diced potatoes or sweet potatoes
Broth + Flavor
3 cups chicken broth
¾ cup full-fat coconut milk
1 tsp turmeric
½ tsp cumin
½ tsp paprika
¾ tsp sea salt (to taste)
Juice of ½ lemon
Optional Finish
Fresh parsley or cilantro
Red pepper flakes
Extra squeeze of lemon
👩🍳 Easy Step-by-Step Instructions
Step 1: Brown the Chicken
Heat oil in a large pot over medium heat.
Add the chicken, season lightly with salt, and cook for 4–5 minutes until lightly browned.
Remove and set aside.
Step 2: Build the Flavor Base
In the same pot, sauté the onion for 3–4 minutes until softened.
Add garlic and ginger and cook for about 1 minute, just until fragrant.
Step 3: Add Veggies + Spices
Stir in carrots, potatoes, zucchini, turmeric, cumin, paprika, and salt.
Cook for 2–3 minutes, letting the spices toast slightly to deepen the flavor.
Step 4: Simmer the Stew
Add the chicken broth and bring to a gentle simmer.
Return the chicken to the pot and cook for 15–18 minutes, until the vegetables are tender and the chicken is fully cooked.
Step 5: Finish Creamy + Bright
Stir in the coconut milk and lemon juice.
Let simmer for another 2 minutes, taste, and adjust seasoning if needed.
Top with herbs and serve warm.
🍽 How to Serve It
This stew is great on its own, but you can also:
Serve over rice or cauliflower rice
Pair with roasted veggies
Add a simple side salad
Or enjoy it as a one-bowl meal
🔥 Meal Prep Tips
Keeps well for 3–4 days in the fridge
Flavor gets even better overnight
Freezes beautifully for future meals
Final Thoughts 💛
Healthy eating doesn’t have to mean bland food or complicated cooking.
Sometimes it’s just about finding meals that feel warm, satisfying, and supportive of how you want to feel — meals you actually look forward to making again.
This Golden Turmeric Chicken Stew is one of those recipes. Simple, nourishing, and perfect for the weeks when you want something cozy without going off track.
If you make it, let me know what veggies you added — this one’s super easy to customize 🍲✨
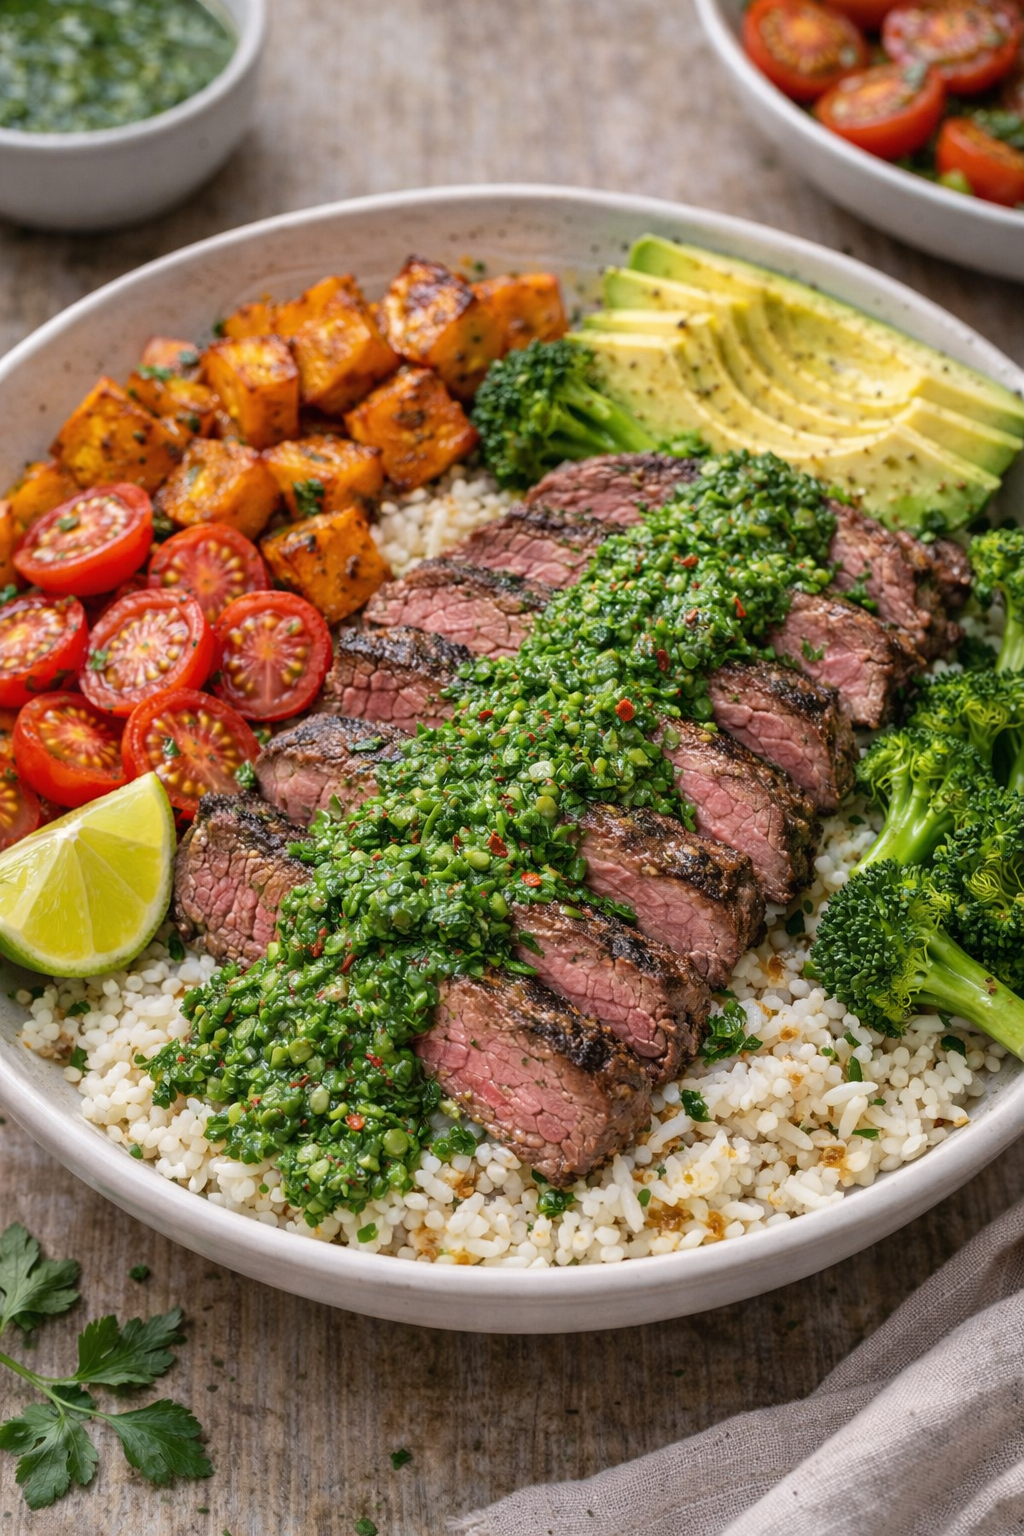
Chimichurri Steak Bowls 🥩🌿

There’s something about a steak bowl that just hits different.
It feels hearty. Satisfying. A little indulgent.
But when it’s done right, it can also be fresh, balanced, and incredibly nourishing.
That’s why this Chimichurri Steak Bowl has always been one of my favorites.
It’s bold without being heavy. Protein-packed without being boring. And that bright, herby chimichurri? It turns a simple steak dinner into something that feels restaurant-level — without complicated prep or a long ingredient list.
This is the kind of meal you make when you want to eat well…
but still want dinner to feel exciting.
Why This Recipe Works So Well
This bowl is a perfect example of healthy eating that doesn’t feel restrictive:
High-quality protein to keep you full and energized
Healthy fats from olive oil and herbs
Naturally gluten-free & dairy-free
Fresh flavors that balance out the richness of the steak
Easy to prep, easy to repeat
It’s great for weeknights, meal prep, or anytime you want a meal that feels a little special without being a project.
🥩 Chimichurri Steak Bowls
⏱ Quick Stats
Prep Time: 15 minutes
Cook Time: 10–12 minutes
Total Time: ~30 minutes
Serves: 4
🛒 Ingredients
Steak
1½ lbs flank steak, skirt steak, or sirloin
1 tbsp olive or avocado oil
¾ tsp sea salt
½ tsp black pepper
Chimichurri Sauce
1 cup fresh parsley, finely chopped
3 cloves garlic, minced
2 tbsp fresh red wine vinegar
½ cup olive oil
½ tsp sea salt
¼ tsp crushed red pepper flakes (optional)
Bowl Base + Toppings
Cauliflower rice, white rice, or mixed greens
Roasted sweet potatoes or potatoes
Cherry tomatoes or roasted peppers
Avocado slices
👩🍳 Easy Step-by-Step Instructions
Step 1: Make the Chimichurri
In a bowl, combine:
parsley, garlic, red wine vinegar, olive oil, salt, and red pepper flakes.
Stir well and set aside.
(The longer it sits, the better it gets.)
Step 2: Prep the Steak
Pat steak dry and rub with oil, salt, and pepper.
Let it rest at room temperature for about 10 minutes while you heat your pan or grill.
Step 3: Cook the Steak
Heat a skillet or grill over medium-high heat.
Cook steak 4–5 minutes per side, depending on thickness, until desired doneness.
Remove from heat and let rest 5 minutes, then slice against the grain.
Step 4: Build Your Bowls
Start with your base:
cauliflower rice
white rice
or greens
Add:
sliced steak
roasted veggies
avocado
Finish with a generous spoonful of chimichurri over the top.
🍽 How to Serve These Bowls
This bowl is incredibly flexible:
Keep it low-carb with cauliflower rice
Make it heartier with rice or potatoes
Turn it into a salad bowl with mixed greens
Add extra chimichurri (always the right move)
🔥 Meal Prep Tips
Steak keeps well for 5 days
Store chimichurri separately for best flavor
Reheat steak gently to avoid overcooking
Final Thoughts 💛
Healthy eating doesn’t mean giving up bold flavors or satisfying meals.
Sometimes it’s about finding recipes that make you feel strong, fueled, and excited to eat — and this Chimichurri Steak Bowl does exactly that.
If you try it, let me know how you build yours — extra chimichurri fans are always welcome 🌿🥩
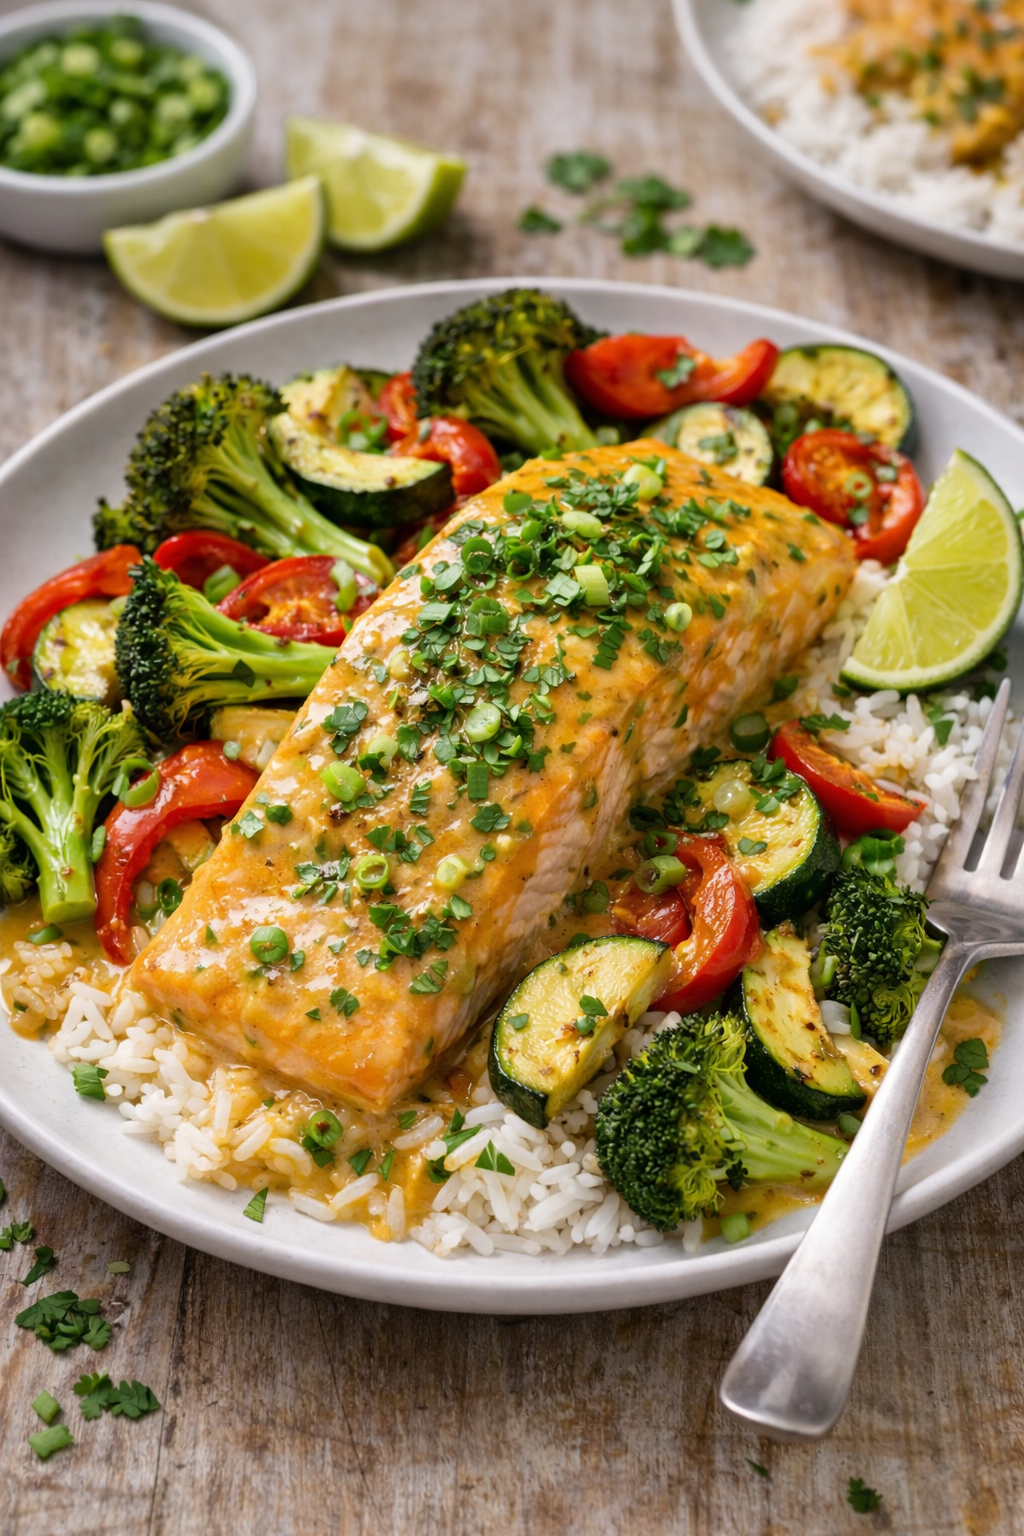
Coconut Curry Salmon with Roasted Veggies 🥥🍛

There’s a point in the week where you want something that feels a little special.
Not “I’m cooking a three-course meal” special…
but also not “I guess we’re eating leftovers again” special.
You want real food.
You want flavor.
And you want to feel good after you eat — not heavy, not sluggish, not wondering why you bothered.
That’s exactly why this Coconut Curry Salmon has become one of my favorite go-to meals when we want something comforting and nourishing.
It’s warm, creamy, and full of flavor — without any dairy, gluten, or complicated steps. The coconut curry sauce feels indulgent, the salmon is rich and satisfying, and the roasted veggies balance everything out perfectly.
It’s the kind of dinner that feels like takeout…
but leaves you energized instead of weighed down.
Why This Recipe Works So Well
This is one of those meals that checks a lot of boxes:
High-quality protein + omega-3s from salmon
Anti-inflammatory fats from coconut milk
Naturally gluten-free & dairy-free
Veggie-packed without feeling like “health food”
Simple enough for a weeknight, impressive enough to serve guests
It’s comforting without being heavy — which makes it perfect for a healthy reset or anytime you want to eat well without overthinking it.
🥥 Coconut Curry Salmon with Roasted Veggies
⏱ Quick Stats
Prep Time: 10 minutes
Cook Time: 18–20 minutes
Total Time: ~30 minutes
Serves: 4
🛒 Ingredients
Salmon + Veggies
1½ lbs wild-caught salmon fillets
1 red bell pepper, sliced
1 zucchini, sliced
1 cup broccoli florets
1 tbsp olive oil or avocado oil
½ tsp sea salt
Coconut Curry Sauce
¾ cup full-fat coconut milk
1½ tbsp red curry paste (check GF)
1 tsp fresh grated ginger
2 cloves garlic, minced
1 tbsp coconut aminos
Juice of ½ lime
Optional Toppings
Fresh cilantro
Green onion
Lime wedges
👩🍳 Easy Step-by-Step Instructions
Step 1: Preheat + Prep
Preheat your oven to 400°F.
Line a baking sheet with parchment paper.
Step 2: Roast the Veggies
Add bell pepper, zucchini, and broccoli to the pan.
Drizzle with oil, sprinkle with salt, and toss to coat.
Roast for 10 minutes, until veggies start to soften.
Step 3: Make the Coconut Curry Sauce
While the veggies roast, whisk together:
coconut milk
red curry paste
ginger
garlic
coconut aminos
lime juice
Taste and adjust if needed — you can add more lime for brightness or a touch more curry paste for depth.
Step 4: Add Salmon + Sauce
Remove the pan from the oven and push the veggies slightly aside.
Place salmon fillets on the pan, season lightly with salt, and spoon the coconut curry sauce over the top.
Step 5: Finish Baking
Return the pan to the oven and bake for 8–10 minutes, until the salmon is cooked through and flakes easily with a fork.
Step 6: Serve
Plate salmon with roasted veggies and spoon extra sauce from the pan over the top.
Finish with fresh cilantro, green onion, and a squeeze of lime.
🍽 How to Serve This Dish
This recipe is incredibly flexible. Try it:
Over cauliflower rice for a lighter option
With jasmine rice to soak up the sauce
On top of mixed greens for a warm salad
With roasted sweet potatoes for extra comfort
🔥 Meal Prep Tips
Store salmon and veggies together in airtight containers
Keeps well for 5 days in the fridge
Reheat gently so the salmon stays tender
Final Thoughts 💛
Healthy eating doesn’t have to mean bland food or complicated cooking.
Sometimes it’s just about finding a few recipes that feel comforting, flavorful, and doable — meals that help you stay consistent without feeling restricted.
This Coconut Curry Salmon is one of those recipes.
It’s simple, satisfying, and the kind of meal you’ll actually look forward to making again.
If you try it, let me know how you served it — I’m always curious what base everyone chooses 🥥🍛